
Magical Candy Cane Cookies: A Festive Treat with a Twist
INTRODUCTION
Growing up, the holiday season was a time of anticipation and cozy togetherness. I vividly remember the kitchen bustling with my family, the sweet scent of freshly baked goods wafting through the air, a prelude to our favorite tradition: making candy cane cookies. These cookies aren’t just delicious; they embody the spirit of Christmas with their vibrant red and white stripes and refreshing peppermint flavor.
Now, I know what you might be thinking: "Aren’t all candy cane cookies the same?" But trust me, this recipe is different! It’s a labor of love that combines rich butter, the perfect sprinkle of sweetness, and that delightful peppermint essence which transports you straight to a winter wonderland. More than just a festive treat, they’re a piece of my childhood, stirring up warm memories of laughter and joy with each bite.
In this post, not only will you learn how to create your very own candy cane cookies, but I’ll share tips on making them even more special. Ready to roll up your sleeves and start a new holiday tradition? Let’s dive into the wonderful world of candy cane cookies!
WHAT ARE Candy Cane Cookies?
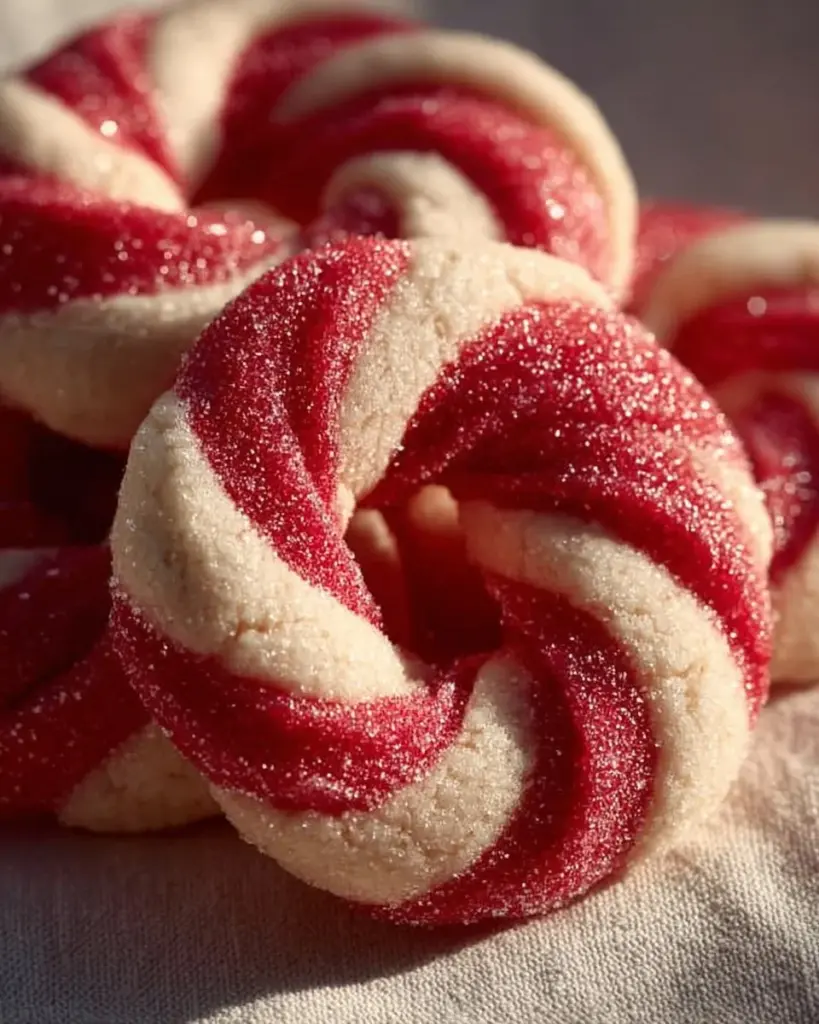
Candy Cane Cookies are a quintessential Christmas treat that encapsulates the spirit of the season in both flavor and form. Traditionally, these delightful cookies are characterized by their signature twisted shape resembling a classic candy cane, with a vibrant alternating mix of red and white colors. Originating from the German tradition of baking in the shape of festive motifs, these cookies are a delicious blend of buttery goodness and the invigorating essence of peppermint.
When you take a bite, expect a satisfying crunch on the outside with a tender, melt-in-your-mouth texture on the inside. The flavors are a perfect balance of sweet vanilla, rich butter, and a refreshing burst of peppermint that dances on your palate. Candy Cane Cookies are the ideal holiday treat, perfect for sharing with loved ones or adorning your dessert table during festive gatherings.
These cookies are best made during the holiday season when warmth and joy fill the air. Whether you’re baking them for a family gathering, a school event, or simply to enjoy yourself, these treats bring people together and create lasting memories.
WHY YOU’LL LOVE THIS RECIPE
Here are a few reasons this candy cane cookie recipe will steal your heart—and your taste buds!
Flavorful Bliss: The combination of vanilla and peppermint extracts creates a sophisticated flavor profile that leaves your mouth watering. Trust me, you won’t find this combination in your average bakery.
Cost-Effective: Making your own candy cane cookies is not only more delicious, but it’s also incredibly budget-friendly! With simple ingredients you likely already have at home, you can whip up a batch for a fraction of the cost of store-bought cookies.
Customization Galore: Feeling adventurous? You can easily swap in different extracts or food coloring to give these cookies a personal twist. Add chocolate chips or crushed candies for an extra flavor explosion!
Fun for Everyone: Baking these cookies is a fantastic activity for families, friends, or even solo kitchen warriors. Kids and adults alike will love twisting the dough together to create those iconic shapes.
Ease of Preparation: Don’t let the impressive look fool you—these cookies are straightforward to make! Even if you’re not a baking pro, you’ll be amazed at just how easy they are to prepare. Plus, the process is incredibly rewarding.
In no time, you’ll have a vibrant platter of candy cane cookies that not only look inviting but taste divine—much better than anything you’ll find at a store!
INGREDIENTS SECTION
To create these festive magic treats, gather the following ingredients:
- 1 cup butter, softened: Using unsalted butter allows you to control the salt level in your cookies. For an ultra-creamy texture, opt for high-quality butter brands like Kerrygold or Plugra.
- 1 cup powdered sugar: Sifted for smoothness for a melt-in-your-mouth effect.
- 1 egg: Room temperature eggs incorporate more easily into your dough.
- 1 teaspoon vanilla extract: Use a pure extract for the best flavor.
- 2 teaspoons peppermint extract: This is the star of our show, so use the best quality you can find.
- 2 3/4 cups all-purpose flour: Spoon and level the flour for accuracy. If gluten-free is your goal, a versatile gluten-free 1-to-1 baking blend works well here.
- 1 teaspoon baking powder: This adds a bit of lift while baking.
- 1/4 teaspoon salt: Enhances the sweetness of the cookies.
- Red food coloring: Gel food coloring gives you vibrant results without altering the dough’s consistency. Use a reputable brand like Wilton.
- Granulated sugar for coating: This adds a sparkling finish to your cookies, making them irresistible!
Prep Notes: Bring your butter and egg to room temperature for optimum blending and texture.
STEP-BY-STEP INSTRUCTIONS
Ready for the fun part? Let’s get baking! Follow these steps, and you’ll have a festive batch of candy cane cookies in no time:
Preheat your oven to 375°F (190°C). This ensures even baking from the moment the cookies hit the oven.
In a large bowl, cream together the softened butter and powdered sugar until the mixture is light and fluffy, about 3-5 minutes. This step is crucial for creating a tender texture.
Beat in the egg, vanilla extract, and peppermint extract until well combined. The mixture should be smooth and fragrant.
In another bowl, combine the flour, baking powder, and salt. Gradually add this dry mixture to the creamed mixture until it is well blended. Be careful not to overmix; stop just when no more flour streaks are visible.
Divide the dough in half. Color one half with red food coloring by kneading it in until it reaches your desired hue.
Roll small pieces of each color dough into 4-inch ropes. Twist together one red and one white piece. Shape them into a candy cane form, ensuring the ends are curved.
Place the cookies on ungreased baking sheets. Make sure to leave enough space between them, as they will spread slightly!
Sprinkle with granulated sugar before baking to give that festive sparkle!
Bake for 9-10 minutes, or until they are set but not brown. The edges should look firm while the centers remain soft.
Cool on wire racks before enjoying them or packaging them up as gifts.
Chef’s Tips:
- Visual cues: Look for lightly golden edges and a soft center.
- If the dough is too sticky, chill it in the refrigerator for 30 minutes.
- Common mistakes to avoid: Don’t skip the cooling step; warm cookies can fall apart when lifted!
EXPERT TIPS & TRICKS
Here are some professional tips to ensure your candy cane cookies turn out perfect every time:
Ingredient Quality: Use the highest quality extracts you can find; they make a world of difference in flavor.
Storage Recommendations: Store your cookies in an airtight container at room temperature for up to a week, or freeze them for up to 3 months.
Make-Ahead Instructions: You can prepare the dough ahead of time and refrigerate it for up to 3 days before baking. This brings out the flavors even more!
Troubleshooting: If your cookies spread too much, try chilling the dough before forming into shapes, or add a touch more flour for extra stability.
Perfect for Gifting: These cookies make great holiday gifts! Arrange them in a festive box with some decorative tissue paper for a lovely presentation.
SERVING SUGGESTIONS
These candy cane cookies are delightful on their own, but why not elevate the experience? Serve them alongside a hot cup of cocoa or peppermint tea for the ultimate cozy treat.
For presentation, layer them on a festive platter dusted with powdered sugar, or place them in a clear bag tied with a red ribbon for a charming gift. They’re perfect for holiday cookie exchanges, family gatherings, or simply as a sweet treat enjoyed by the fire!
VARIATIONS & SUBSTITUTIONS
Feeling creative? Here are some fun variations and adaptations:
- Chocolate Chip Candy Cane Cookies: Fold in mini chocolate chips for a delicious twist. They blend beautifully with the peppermint flavor.
- Gluten-Free: Swap the flour for a gluten-free blend to make these cookies suitable for those with dietary restrictions.
- Seasonal Variants: Try substituting the peppermint extract with orange or almond for a different flavor profile. The bright red and white colors can also be switched up for Valentine’s Day or other celebrations!
NUTRITION & STORAGE INFO
- Prep time: 20 minutes
- Cook time: 10 minutes
- Total time: 30 minutes
- Yield: Approximately 24 cookies
- Estimated calories per serving: 100 calories per cookie
- Storage instructions: Keep at room temperature in an airtight container for up to 1 week; freeze for up to 3 months.
FAQ SECTION
Can I use a different extract instead of peppermint?
Yes, you can experiment with flavors like almond or vanilla for a unique taste!What if my dough is too sticky?
Chill your dough in the refrigerator for about 30 minutes before rolling and cutting shapes.Can I make the dough in advance?
Absolutely! Make it a day or two ahead and keep it in the refrigerator.How can I make these cookies look more festive?
Sprinkle crushed candy canes on top before baking for an extra crunch and seasonal flair.Is it okay to freeze these cookies?
Yes! They freeze wonderfully. Just ensure they’re in an airtight container to prevent freezer burn.What’s the best way to store these cookies?
Keep them in an airtight container at room temperature to maintain their freshness.Are these cookies suitable for a gluten-free diet?
Yes, by using a 1-to-1 gluten-free flour blend, these cookies can easily be made gluten-free.Can I add chocolate chips to the dough?
Absolutely! Mini chocolate chips blend beautifully and add a delightful sweetness.How can I make the candy cane shape more pronounced?
Roll the ropes thinner to emphasize the twist effect when forming the shapes.What’s the best way to gift these cookies?
Package them in holiday-themed bags or boxes with a decorative ribbon for a lovely, personalized touch.
CONCLUSION
Ultimately, these candy cane cookies are not just a holiday treat; they are a gateway to creating cherished memories filled with love and laughter. With their enchanting flavors and enchanting looks, they’re sure to become a favorite in your household—and perhaps even a new tradition! I encourage you to give this recipe a try and let me know how they turn out in the comments below. If you enjoyed this recipe, be sure to check out some of my other festive delights on the blog! Happy baking!
Magical Candy Cane Cookies
Delicious candy cane-shaped cookies with a refreshing peppermint flavor, perfect for the holiday season.
- Prep Time: 20 minutes
- Cook Time: 10 minutes
- Total Time: 30 minutes
- Yield: 24 cookies 1x
- Category: Dessert
- Method: Baking
- Cuisine: American
- Diet: Vegetarian
Ingredients
- 1 cup butter, softened
- 1 cup powdered sugar, sifted
- 1 egg, room temperature
- 1 teaspoon vanilla extract
- 2 teaspoons peppermint extract
- 2 3/4 cups all-purpose flour
- 1 teaspoon baking powder
- 1/4 teaspoon salt
- Red food coloring
- Granulated sugar for coating
Instructions
- Preheat your oven to 375°F (190°C).
- Cream together the softened butter and powdered sugar until light and fluffy, about 3-5 minutes.
- Beat in the egg, vanilla extract, and peppermint extract until combined.
- In another bowl, combine the flour, baking powder, and salt. Gradually add to the creamed mixture until well blended.
- Divide the dough in half. Color one half with red food coloring.
- Roll small pieces of each color into 4-inch ropes. Twist together one red and one white piece into a candy cane shape.
- Place cookies on ungreased baking sheets, leaving space in between.
- Sprinkle with granulated sugar before baking.
- Bake for 9-10 minutes or until set but not brown. Cool on wire racks before serving.
Notes
Store in an airtight container for up to 1 week, or freeze for up to 3 months.
Nutrition
- Serving Size: 1 cookie
- Calories: 100
- Sugar: 10g
- Sodium: 55mg
- Fat: 6g
- Saturated Fat: 4g
- Unsaturated Fat: 2g
- Trans Fat: 0g
- Carbohydrates: 12g
- Fiber: 0g
- Protein: 1g
- Cholesterol: 30mg


