
Irresistible Peppermint Cake: A Festive Delight for Every Celebration
There’s something magical about baking during the holidays. I still remember those cozy afternoons in my grandma’s kitchen, surrounded by the aroma of peppermint mingling with sweet vanilla and rich chocolate. It was there that I first tasted her legendary Peppermint Cake, a dessert that instantly became intertwined with my fondest family memories. The fresh pop of peppermint complemented by luscious white chocolate made every slice a celebration in itself.
What sets this cake apart is more than just its festive spirit; it’s the interplay of flavors and textures that create absolute bliss. While store-bought treats might skimp on the quality or leave out that homemade touch, this recipe guarantees a cake that you can truly be proud of. As you whip up your own Peppermint Cake, you’ll find the joy of creating sweet memories in your kitchen.
In this post, I’m excited to share my tried-and-true recipe for Peppermint Cake that brings back those nostalgic flavors and moments. You’ll learn how to make a fluffy, moist cake layered with creamy peppermint frosting and topped with crunchy candy cane bits. Whether you’re celebrating with family or entertaining friends, this cake will undoubtedly be a crowd-pleaser!
What are Peppermint Cakes?
Peppermint Cakes have a rich history tied to festive celebrations and winter festivities. Originating as a seasonal favorite, they are typically enjoyed during the holiday season but are delightful year-round. This cake brings together the vibrant essence of peppermint and the sweet decadence of white chocolate, offering a flavor profile that’s refreshing yet indulgent.
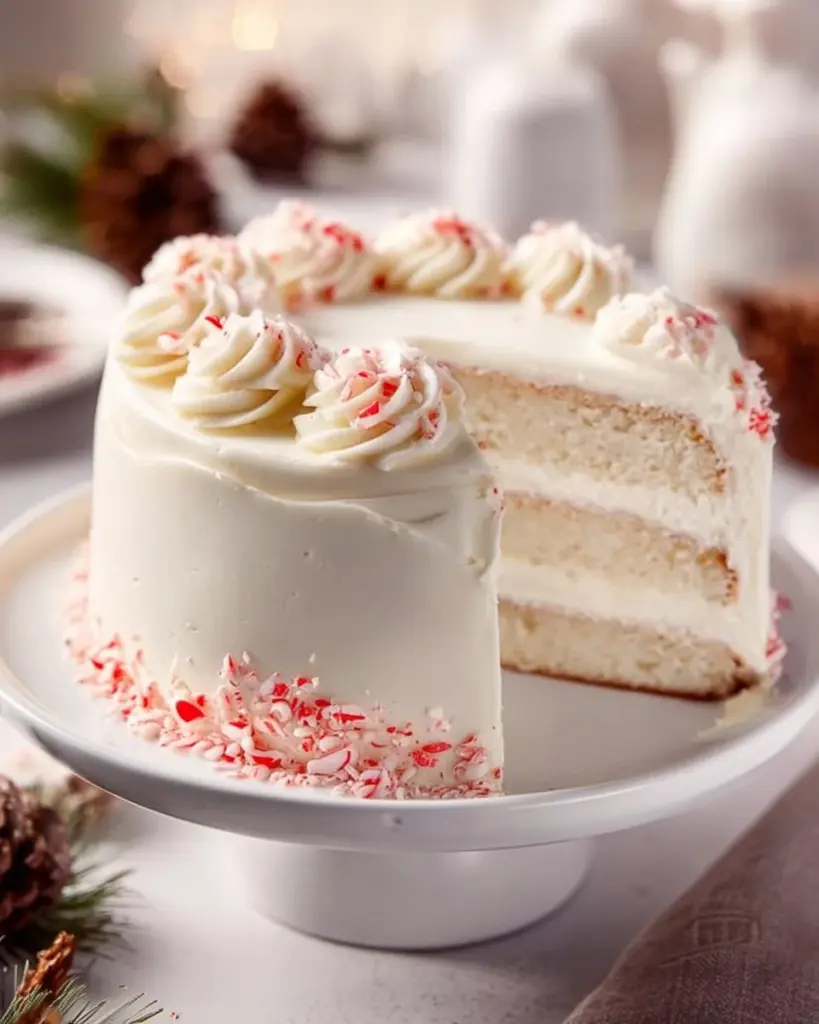
The texture is light and fluffy, allowing each bite to melt in your mouth, followed by a satisfying crunch from the candy cane toppings. This unique combination of flavors makes it perfect for joyful occasions, holiday parties, or simply to brighten up a gray winter day.
You can make Peppermint Cake for special gatherings, festive parties, or just when you need a little extra cheer in your life. Trust me, once you delight in a slice of this cake, you’ll understand why it has become a beloved tradition for so many!
Why You’ll Love This Recipe
Unbeatable Flavor: The blend of peppermint and white chocolate gives this cake an extraordinary taste that transports you straight into the holiday spirit. Unlike the lackluster flavors of store-bought cakes, this recipe ensures you’ll savor each bite to the fullest.
Cost-Effective Treat: Making Peppermint Cake at home is not only fun but also budget-friendly! The ingredients are accessible, and you’ll save money compared to overpriced gourmet cakes.
Customization Galore: Feel free to adapt the flavor profile! Want a stronger chocolate flavor? Add more cocoa! Need it to be gluten-free? Substitute the all-purpose flour with a gluten-free blend; your creativity knows no bounds here.
Simple to Make: With straightforward steps and basic ingredients, even beginner bakers can tackle this recipe. You’ll feel like a pro in no time, impressing your loved ones with your culinary skills.
Time Efficiency: From start to finish, you can whip up this delicious cake in about an hour and 45 minutes. Perfect for those busy holiday mornings when you want to impress!
Embrace this recipe and treat yourself to a slice of joy. You’ll find it hard to resist baking this indulgent Peppermint Cake again and again!
Ingredients Section
To create your own mouthwatering Peppermint Cake, you’ll need the following high-quality ingredients. I recommend using organic and fresh items whenever possible for the best flavor.
For the Cake:
- 2 ½ cups all-purpose flour
- Tip: Use a measured spoon to avoid packing the flour.
- 2 ½ tsp baking powder (preferably aluminum-free for softer cakes)
- ½ tsp salt (I love using a fine sea salt for a balanced flavor)
- ½ cup unsalted butter, softened (I recommend brands like Kerrygold for richer flavor)
- 1 ½ cups granulated sugar
- 4 large eggs (organic if possible for the best results)
- 1 cup milk (whole milk enhances creaminess)
- 1 tsp vanilla extract
- ½ tsp peppermint extract (pure peppermint extract gives the best flavor)
- 1 cup white chocolate, melted (Ghirardelli or Scharffen Berger are fantastic choices)
Optional (for Color):
- 1 cup unsweetened cocoa powder
For the Frosting:
- 1 cup unsalted butter, softened
- 4 cups powdered sugar
- ¼ cup heavy cream
- ½ tsp peppermint extract
For Topping:
- Crushed candy canes (about 4-6 full-sized candy canes works nicely)
Prep Notes:
- Ensure butter is at room temperature for easier creaming with sugar.
- The crushed candy canes add a delightful crunch and festive touch to your cake.
Step-by-Step Instructions
Ready to bake something spectacular? Let’s dive into the process of creating your Peppermint Cake!
Preheat your oven to 350°F (175°C). Grease and flour two 9-inch round cake pans.
- Chef’s Tip: Line the bottom with parchment paper for easy release!
In a bowl, whisk together the flour, baking powder, and salt. Set aside.
In a large mixing bowl, cream together the softened butter and granulated sugar until light and fluffy. This should take about 3-5 minutes.
- Visual cue: Look for a pale and airy texture.
Add the eggs, one at a time, mixing well after each addition until fully incorporated.
Stir in the milk, vanilla, and peppermint extracts until fully blended.
Gradually add the dry ingredients into the wet mixture until just combined. Be careful not to overmix.
Fold in the melted white chocolate gently using a spatula to maintain the airiness of the batter.
Divide the batter evenly between the prepared pans. Give them a gentle shake to level the batter.
- Expert Tip: Use a kitchen scale for precisely equal weights.
Bake for 25-30 minutes, or until a toothpick comes out clean from the center.
- Chef’s Tip: Start checking around the 25-minute mark to avoid dry cakes.
Let the cakes cool in the pans for 10 minutes. Then, transfer them to wire racks to cool completely.
For the frosting, beat together the softened butter, powdered sugar, heavy cream, and peppermint extract until smooth and fluffy.
Once the cakes are cooled, spread frosting between the layers and on the top and sides of the cake, smoothing it out nicely.
Decorate with crushed candy canes on top for that delightful festive touch!
Slice and enjoy your Peppermint Cake!
Expert Tips & Tricks
Storage: Your Peppermint Cake can be stored at room temperature for 2-3 days. If you want to preserve its freshness, pop it into the fridge in an airtight container!
Make-Ahead: You can bake the cakes a day in advance. Just wrap them tightly in plastic wrap after cooling completely, and store them in the fridge.
Troubleshooting: If your cake sinks in the center, it might be due to overmixing or underbaking. Keep a close eye on the baking time and your mixing technique!
Frosting Perfected: If your frosting is too thin, add more powdered sugar; too thick? Add a splash more heavy cream until you reach the desired consistency.
Serving Suggestions
Your Peppermint Cake is perfect on its own, but here are a few serving ideas to elevate the experience:
- Serve with a dollop of freshly whipped cream on the side for added indulgence.
- Pair with a steamy cup of peppermint tea or a rich hot chocolate to enhance the festive vibe.
- For special occasions, consider presenting each slice on a festive plate garnished with a sprig of mint or a few extra crushed candy canes.
Variations & Substitutions
Want to mix things up? Here are some delightful variations for your Peppermint Cake:
Chocolate Peppermint Cake: Add 1 cup of unsweetened cocoa powder to the dry ingredient mix for a richer chocolate version. Balance the flavors by increasing the peppermint extract slightly.
Gluten-Free Version: Substitute the all-purpose flour with a quality gluten-free baking blend. Most are designed to mimic standard baking flour closely.
Nut Lover’s Delight: Incorporate finely chopped walnuts or pecans into the batter for texture and flavor.
Seasonal Variations: Try using crushed gingerbread cookies for an even more festive touch during the holidays!
Nutrition & Storage Info
- Prep Time: 30 minutes
- Cook Time: 30 minutes
- Total Time: 1 hour 45 minutes
- Yield: Serves 12 slices
- Estimated Calories: Approximately 300 calories per slice
Storage Instructions:
- Room Temperature: 2-3 days in an airtight container.
- Refrigerator: 5-7 days.
- Freezer: Will last up to 3 months. Just make sure to wrap slices tightly in plastic wrap before freezing.
FAQ Section
1. Can I use milk alternatives?
Absolutely! Almond or oat milk would work nicely.
2. What can I substitute for eggs in this recipe?
You can use flax eggs; just mix 1 tablespoon of ground flaxseed with 2.5 tablespoons of water to replace one egg.
3. Can I freeze the cake?
Yes! Just freeze slices individually wrapped and then placed in an airtight container.
4. Can I omit the white chocolate?
Of course! The cake will still be delicious. Just add a bit more cocoa powder for that rich flavor.
5. How do I fix a dry cake?
Make sure not to overbake. If it does happen, you can serve it with whipped cream to add moisture.
6. What if my frosting is too sweet?
Add a pinch of salt to cut the sweetness!
7. How do I decorate the cake?
You can use fruit, additional frosting, or even a drizzle of chocolate ganache for a stunning presentation.
8. Is there a vegan option for this cake?
Yes, use flax eggs, coconut cream, and appropriate substitutes for butter and milk as mentioned.
9. Can I make mini cakes?
Absolutely! Just adjust the baking time to about 15-20 minutes for smaller cake pans.
10. Is this cake suitable for kids?
Definitely! Its festive flavors and fun toppings make it a hit with kids and adults alike!
Conclusion
This Peppermint Cake is not just a dessert; it’s a celebration of flavors, memories, and warmth. I hope you give this recipe a try and create some unforgettable moments in your kitchen. Don’t forget to leave some feedback in the comments – I love hearing about your baking adventures! And if you’re looking for more delicious ideas, check out my other festive recipes on the blog. Happy baking!
PrintIrresistible Peppermint Cake

A fluffy, moist cake layered with creamy peppermint frosting and topped with crunchy candy cane bits, perfect for festive celebrations.
- Prep Time: 30 minutes
- Cook Time: 30 minutes
- Total Time: 105 minutes
- Yield: 12 servings 1x
- Category: Dessert
- Method: Baking
- Cuisine: American
- Diet: Vegetarian
Ingredients
- 2 ½ cups all-purpose flour
- 2 ½ tsp baking powder
- ½ tsp salt
- ½ cup unsalted butter, softened
- 1 ½ cups granulated sugar
- 4 large eggs
- 1 cup milk
- 1 tsp vanilla extract
- ½ tsp peppermint extract
- 1 cup white chocolate, melted
- 1 cup unsweetened cocoa powder (optional)
- 1 cup unsalted butter, softened (for frosting)
- 4 cups powdered sugar (for frosting)
- ¼ cup heavy cream (for frosting)
- ½ tsp peppermint extract (for frosting)
- Crushed candy canes (for topping)
Instructions
- Preheat your oven to 350°F (175°C). Grease and flour two 9-inch round cake pans.
- In a bowl, whisk together the flour, baking powder, and salt. Set aside.
- In a large mixing bowl, cream together the softened butter and granulated sugar until light and fluffy for about 3-5 minutes.
- Add the eggs, one at a time, mixing well after each addition until fully incorporated.
- Stir in the milk, vanilla, and peppermint extracts until fully blended.
- Gradually add the dry ingredients into the wet mixture until just combined.
- Fold in the melted white chocolate gently using a spatula.
- Divide the batter evenly between the prepared pans and shake to level the batter.
- Bake for 25-30 minutes, or until a toothpick comes out clean from the center.
- Let the cakes cool in the pans for 10 minutes, then transfer to wire racks to cool completely.
- For the frosting, beat together the softened butter, powdered sugar, heavy cream, and peppermint extract until smooth.
- Once the cakes are cooled, spread frosting between the layers and on the top and sides of the cake.
- Decorate with crushed candy canes on top and slice to enjoy.
Notes
Ensure butter is at room temperature for easier creaming with sugar. Store at room temperature for 2-3 days or in the fridge for 5-7 days.
Nutrition
- Serving Size: 1 slice
- Calories: 300
- Sugar: 25g
- Sodium: 200mg
- Fat: 15g
- Saturated Fat: 8g
- Unsaturated Fat: 5g
- Trans Fat: 0g
- Carbohydrates: 43g
- Fiber: 1g
- Protein: 4g
- Cholesterol: 80mg


