
Delightfully Frosted Easter Brownies: A Sweet Celebration for the Whole Family
Let me take you back to my childhood Easter celebrations, where the sun would shine brightly, and the sweet aroma of freshly baked treats would fill my grandmother’s kitchen. Among the colorful décor and cheerful laughter, Frosted Easter Brownies were the crown jewel of our dessert spread. These delectable brownies, swirled with pastel frosting and decorated with candy-coated chocolate eggs, always brought family together.
What makes my version of Frosted Easter Brownies so special, you ask? It’s not just about the perfectly fudgy texture or the delightful sweetness; it’s about creating memories like I had when I was younger. While many recipes offer quick fixes or bland flavors, this one combines rich chocolate and smooth, creamy frosting in a way that will have you and your loved ones coming back for seconds (and maybe thirds!).
In this post, I’ll guide you through my family’s treasured recipe for Frosted Easter Brownies. You’ll learn how to perfect that gooey texture, whip up a pastel rainbow of frosting, and even how to impress your guests with beautiful decorations that will make everyone say, “Wow!” Let’s jump into this delicious adventure and create some sweet memories together!
What Are Frosted Easter Brownies?
Frosted Easter Brownies are not your average dessert; they are a festive treat that embodies the spirit of celebration! This delightful dessert has its roots in traditional brownie recipes, which have been around for over a century, but they have evolved into a joyful staple for spring festivities.
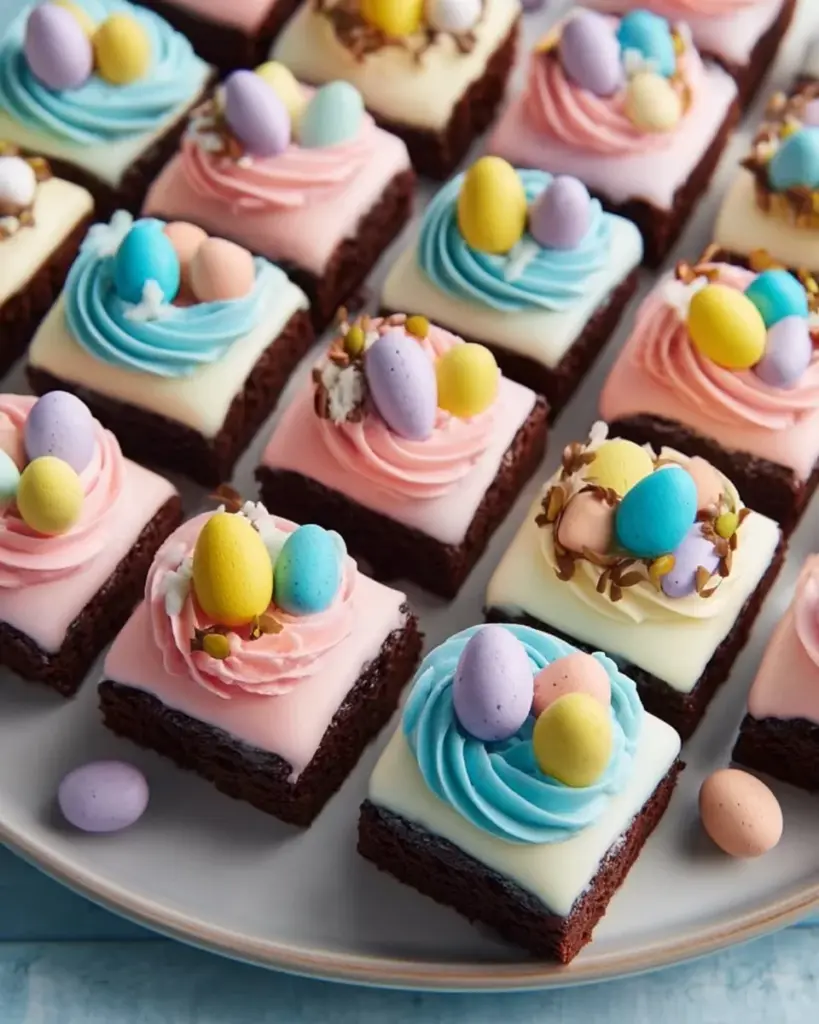
These brownies are rich and fudgy on the inside, with a crisp top that cracks just slightly—oh, the texture! It’s a harmonious blend of rich chocolatey goodness, elevated by a swirl of creamy pastel frosting that resembles the colors of spring. What sets them apart from regular brownies is the playful decoration and the sheer joy they bring.
So when should you make them? Whether for Easter brunch, a springtime gathering, or simply to bring a smile to your family’s faces, Frosted Easter Brownies are the star of any dessert table!
Why You’ll Love This Recipe
Once you experience the magic of homemade Frosted Easter Brownies, there’s no going back to store-bought versions! Here are a few reasons why this recipe will become your go-to for special occasions:
Freshness and Flavor: Unlike store-bought brownies that may taste stale or overly sweet, these are made with fresh ingredients, ensuring each bite bursts with authentic chocolatey flavor.
Cost-Effective: Making brownies at home is significantly cheaper than buying fancy desserts. You’ll get a full batch (24 squares!) for the price of a single slice at a bakery.
Customization: This recipe gives you the freedom to play with flavors and colors! Want a hint of mint? Go for it! Craving crunchy textures? Toss in some nuts or extra chocolate chips! You can personalize them to suit your family’s preferences.
Simplicity: With just a handful of ingredients and straightforward steps, this recipe is beginner-friendly. You don’t need to be a pastry chef to impress with your baking skills!
Treasured Memories: Baking these brownies is not just about satisfaction; it’s about igniting connections with your family and friends. You’ll create moments filled with laughter and love as everyone digs into these cheerful treats.
Ingredients

For the Brownies:
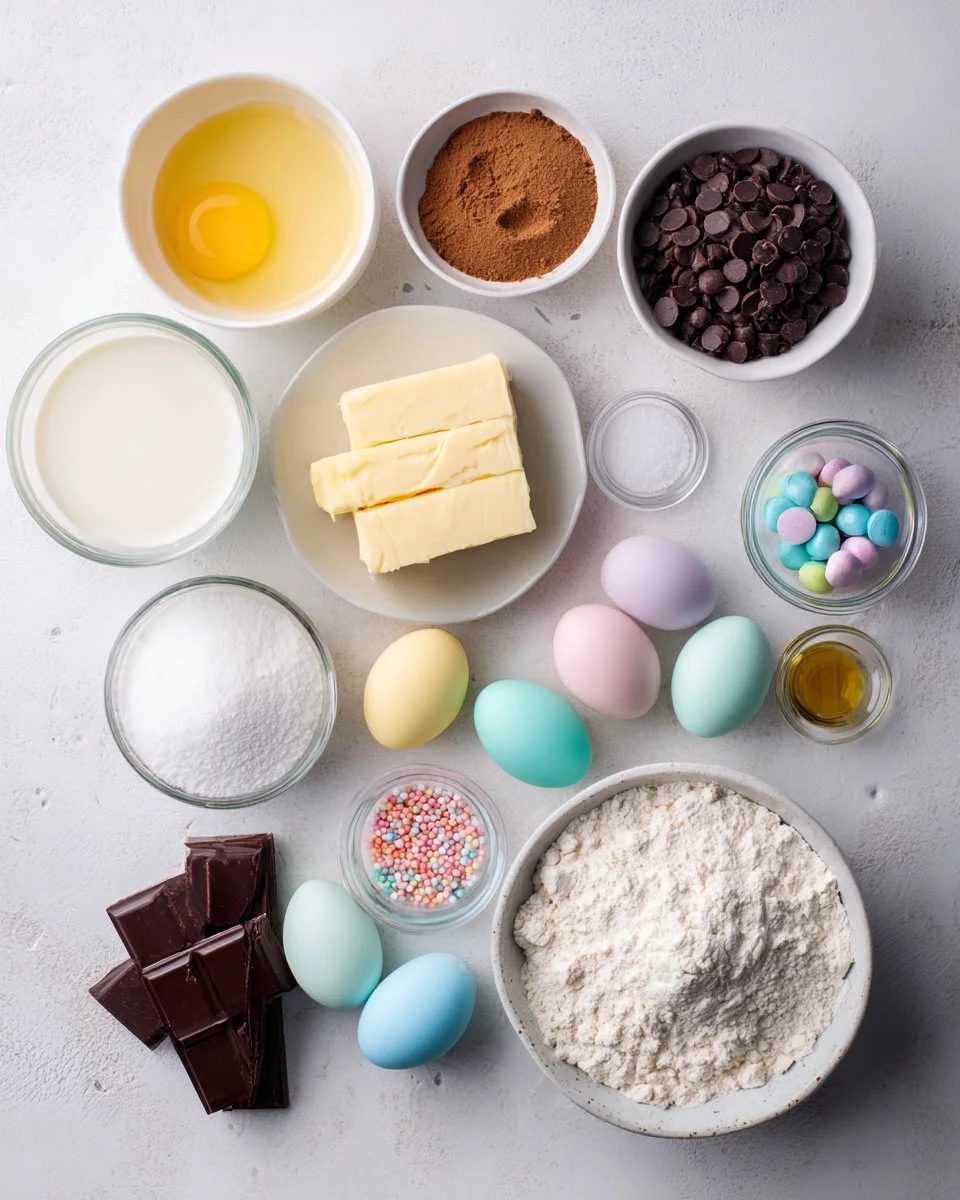
- 1 cup (225g) unsalted butter, melted (I recommend using high-quality European-style butter for a richer flavor)
- 1 1/4 cups (250g) granulated sugar
- 3/4 cup (150g) brown sugar
- 4 large eggs, at room temperature (this ensures they incorporate better)
- 1 tablespoon vanilla extract (pure vanilla extract elevates the flavor)
- 1 cup (120g) all-purpose flour
- 1 cup (85g) unsweetened cocoa powder (I prefer Dutch-processed for a deeper chocolate flavor)
- 1/2 teaspoon salt
- 1/2 teaspoon baking powder
- 1 cup (170g) chocolate chips or chunks (optional, but highly recommended for extra gooeyness!)
For the Frosting:
- 1 cup (225g) unsalted butter, softened
- 3 1/2 cups (440g) powdered sugar
- 2 to 3 tablespoons heavy cream or milk (you can also use coconut milk for a dairy-free option)
- 1 tablespoon vanilla extract (for a lovely aroma)
- Pinch of salt (to balance sweetness)
- Gel food coloring in pastel shades (pink, blue, yellow)
- Mini candy-coated chocolate eggs (for the ultimate decoration!)
- Pastel sprinkles or confetti sprinkles (to add a bit of fun!)
Note: Ensure your butter and eggs are at room temperature for even mixing. Fresh, high-quality ingredients will yield the best results.
Step-By-Step Instructions
Let’s bake these delightful Frosted Easter Brownies together! Follow these steps carefully:
Preheat the oven: Preheat your oven to 175 degrees C (350 degrees F). Line a 9×13-inch baking pan with parchment paper, letting it hang over the edges for easy removal later.
Combine the wet ingredients: In a large bowl, whisk together the melted butter, granulated sugar, and brown sugar until combined. Add the eggs and vanilla extract, and whisk until the mixture is glossy and smooth.
Incorporate the dry ingredients: Sift in the flour, cocoa powder, salt, and baking powder. Gently fold until just combined; be careful not to overmix!
Add optional chocolate chips: If you’re using chocolate chips or chunks, fold them into the batter at this stage.
Bake: Pour the batter into the prepared pan and smooth the top. Bake for 28-32 minutes, or until a toothpick comes out with a few moist crumbs. Don’t overbake!
Cool completely: Once baked, remove from the oven and let the brownies cool completely in the pan on a wire rack.
Prepare the frosting: In a mixing bowl, beat the softened butter until creamy. Gradually add the powdered sugar, vanilla extract, and heavy cream. Beat until fluffy, adjusting the cream to reach your desired consistency.
Color the frosting: Divide the frosting into different bowls and tint with gel food coloring. Create your favorite pastel shades!
Frost the brownies: Spread the colored frosting across the cooled brownies, using a spatula to create fun patterns.
Decorate: Top the frosted brownies with mini candy-coated eggs and pastel sprinkles for that festive touch.
Set: Chill in the refrigerator for 10-15 minutes to set the frosting. Slice into 24 squares, and enjoy!
Chef’s Tips:
- Make sure to check the brownies for doneness at 28 minutes! The gooey texture is the goal, so don’t overbake.
- Use different spatulas to create texture in the frosting. A small offset spatula works wonderfully!
Expert Tips & Tricks
Storage Recommendations: Store the brownies in an airtight container at room temperature for up to 3 days. For longer storage, refrigerate them for up to a week or freeze for up to a month.
Make-ahead Instructions: You can prepare the brownie batter a day in advance! Just chill it in the fridge and bake when you’re ready.
Troubleshooting: If your brownies turn out too dry, it could be from overbaking. Share the love—avoid peeking into the oven too often.
Dress it Up: Serve with whipped cream or a scoop of vanilla ice cream for a delightful contrast!
Double Up: If you’re expecting a crowd, feel free to double the recipe and bake in two pans!
Revive Stale Brownies: A quick zap in the microwave (10 seconds) can bring back that soft texture, making leftovers feel fresh!
Serving Suggestions
These Frosted Easter Brownies are showstoppers all on their own, but if you’d like to enhance the dessert experience, consider the following:
- Serve with a scoop of vanilla ice cream or whipped cream on the side.
- Pair with a rich cup of coffee or refreshing iced tea for those afternoon gatherings.
- They’re perfect for Easter brunch, birthday parties, or any celebration where cheer is required!
Variations & Substitutions
Flavor Combinations: Want a twist? Try adding mint extract for a refreshing chocolate mint brownie or a dash of espresso powder for a mocha experience.
Dietary Adapations: For a gluten-free option, substitute the all-purpose flour with a gluten-free blend. Vegan? Swap out the eggs with flax eggs and use plant-based butter.
Seasonal Variations: For summer, think fruity with fresh berries or for Halloween, make them with orange frosting and black sprinkles!
Nutrition & Storage Info
- Prep Time: 20 minutes
- Cook Time: 28-32 minutes
- Total Time: ~1 hour (including cooling)
- Yield: 24 brownies (depending on how you slice!)
- Estimated Calories: About 250 calories per brownie (exact values vary based on customization).
- Storage Instructions: Keep at room temperature for up to 3 days or refrigerate for a week. Freeze up to one month.
FAQ Section
Can I use cocoa powder instead of chocolate?
Yes! Cocoa powder is the primary ingredient for the chocolate flavor in these brownies.Why did my brownies sink in the middle?
This usually happens due to undercooking. Make sure to check for doneness with a toothpick!Can I make the frosting in advance?
Absolutely! Just store it in the fridge. Bring it to room temperature before using it.Can I use mini chocolate chips instead of regular ones?
Yes, mini chips will work wonderfully and add more chocolatey goodness.How can I prevent my brownies from sticking?
Using parchment paper and greasing the edges will ensure easy removal.What if I don’t have gel food coloring?
Liquid food coloring can also work, but you’ll need to adjust the quantity since gel is concentrated.Are these brownies nut-free?
Yes, unless you choose to add nuts for extra texture!How long can I store these brownies?
They can last at room temperature for 3 days or up to a week in the fridge.Can I use different frosting flavors?
Absolutely! Whip up cream cheese frosting or any flavor you love!Are these suitable for freezing?
Yes! They freeze well; just ensure they’re wrapped tightly.

Conclusion
There you have it—my treasured recipe for Frosted Easter Brownies! These not only deliver on flavor but also on the joy of baking and sharing delicious treats with loved ones. Give this recipe a try and see how it can become a new family tradition.
I’d love for you to share your thoughts and your own experiences with these brownies! Have a favorite twist or decoration? Let your voice be heard in the comments! Don’t forget to check out my other festive recipes on the blog—there’s always something to celebrate! Happy baking!
PrintFrosted Easter Brownies

Delightfully fudgy brownies topped with creamy pastel frosting and decorated with candy-coated chocolate eggs, perfect for Easter celebrations.
- Prep Time: 20 minutes
- Cook Time: 30 minutes
- Total Time: 50 minutes
- Yield: 24 brownies 1x
- Category: Dessert
- Method: Baking
- Cuisine: American
- Diet: Vegetarian
Ingredients
- 1 cup (225g) unsalted butter, melted
- 1 1/4 cups (250g) granulated sugar
- 3/4 cup (150g) brown sugar
- 4 large eggs, at room temperature
- 1 tablespoon vanilla extract
- 1 cup (120g) all-purpose flour
- 1 cup (85g) unsweetened cocoa powder
- 1/2 teaspoon salt
- 1/2 teaspoon baking powder
- 1 cup (170g) chocolate chips or chunks (optional)
- 1 cup (225g) unsalted butter, softened (for frosting)
- 3 1/2 cups (440g) powdered sugar
- 2–3 tablespoons heavy cream or milk
- 1 tablespoon vanilla extract (for frosting)
- Pinch of salt (for frosting)
- Gel food coloring in pastel shades
- Mini candy-coated chocolate eggs (for decoration)
- Pastel sprinkles or confetti sprinkles (for decoration)
Instructions
- Preheat your oven to 350°F (175°C) and line a 9×13-inch baking pan with parchment paper.
- In a large bowl, whisk together melted butter, granulated sugar, and brown sugar until combined. Add eggs and vanilla extract; whisk until glossy and smooth.
- Sift in flour, cocoa powder, salt, and baking powder. Fold until just combined.
- If using, fold in chocolate chips or chunks.
- Pour the batter into the prepared pan and smooth the top. Bake for 28-32 minutes, until a toothpick comes out with a few moist crumbs.
- Once baked, cool completely in the pan on a wire rack.
- In a mixing bowl, beat softened butter for the frosting until creamy. Gradually add powdered sugar, vanilla extract, and heavy cream. Beat until fluffy.
- Divide frosting into bowls and tint with gel food coloring.
- Spread the colored frosting across the cooled brownies, creating fun patterns.
- Decorate with mini candy-coated eggs and pastel sprinkles.
- Chill in the refrigerator for 10-15 minutes to set the frosting. Slice into 24 squares and enjoy.
Notes
For best results, ensure butter and eggs are at room temperature. Store brownies in an airtight container for up to 3 days at room temperature, or refrigerate for a week.
Nutrition
- Serving Size: 1 square
- Calories: 250
- Sugar: 25g
- Sodium: 150mg
- Fat: 12g
- Saturated Fat: 7g
- Unsaturated Fat: 5g
- Trans Fat: 0g
- Carbohydrates: 35g
- Fiber: 2g
- Protein: 3g
- Cholesterol: 50mg


