
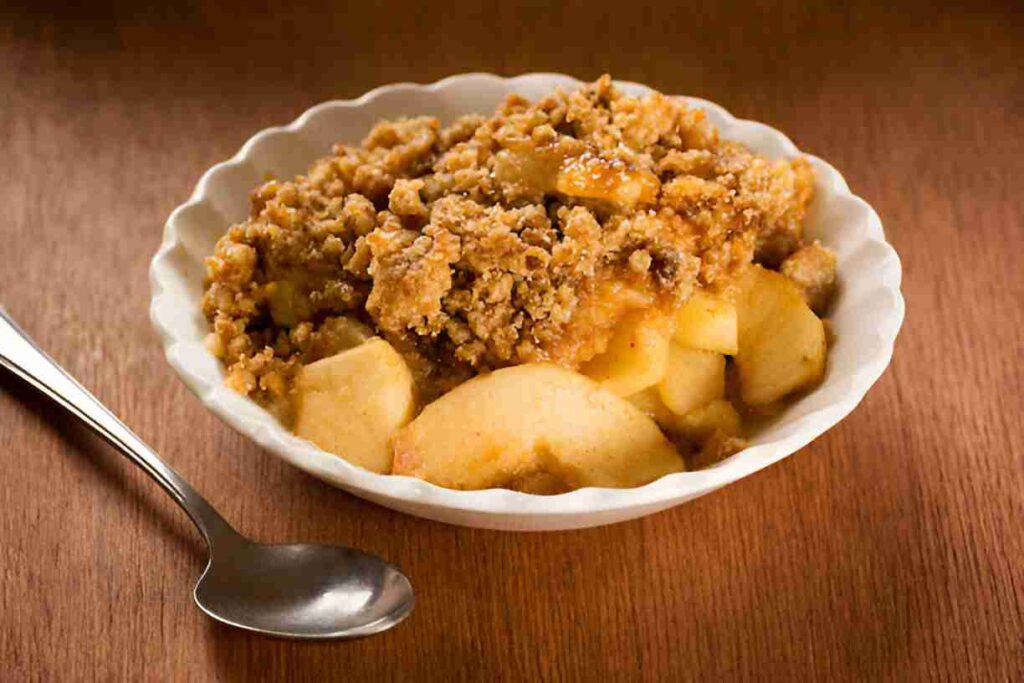
Are you in search of a comforting dessert that brings family and friends together? Look no further than this traditional Apple Crisp recipe. Perfectly combining the sweetness of apples with the crunch of a homemade topping, this dish is not only easy to prepare but also becomes the star of any gathering. In this article, we’ll explore the reasons why you’ll love Apple Crisp, essential ingredients, cooking instructions, and even tips for enhancing its flavors!
Why You’ll Love Apple Crisp
Family-Friendly Delight
What sets Apple Crisp apart from other desserts is its universal appeal. Kids and adults alike relish the warm, gooey apples beneath a deliciously crunchy topping. It’s a treat that sparks joy at family gatherings, particularly during the cozy months of autumn. The ease of this recipe makes it perfect for beginner bakers who want to impress their loved ones without spending hours in the kitchen.
Nutritional Benefits and Simple Ingredients
Using just a handful of wholesome ingredients, Apple Crisp boasts nutritional benefits while remaining satisfyingly indulgent. Apples are high in fiber and various vitamins, providing essential nutrients without excessive calories. By opting for natural sweeteners like brown sugar and wholesome toppings made from oat flour, you can indulge without the guilt.
Adaptable and Budget-Friendly
One of the best features of Apple Crisp is its flexibility. You can easily adjust the recipe to accommodate dietary preferences or seasonal fruits. Whether it’s substituting oats for a gluten-free option or adding in your favorite nuts for extra texture, this dish is as adaptable as it is delicious. Plus, it’s a great way to use up apples that are nearing their prime, making it an economical choice.
Essential Ingredients for the Recipe
Ingredients:
- 1 stick of butter, melted
- 1 1/4 cups oat flour
- 1/4 cup almond flour
- 1 cup lightly packed brown sugar
- 1/2 cup white sugar
- 6 apples, cored and cut into wedges
- 2 teaspoons cinnamon
- 1/2 teaspoon ginger
- Juice of 1/2 lemon
- Pinch of salt
Butter: A Key Player
Butter is an essential ingredient in Apple Crisp, contributing to the rich flavor and moist texture. If you prefer a healthier alternative, try using coconut oil or even applesauce to reduce the fat content without sacrificing taste.
Oat and Almond Flour: Dual Benefits
The combination of oat flour and almond flour not only adds a unique flavor profile to the crisp topping but also provides a hearty texture. For those who are gluten-sensitive, oat flour can be replaced with a gluten-free blend or even ground almond flour for a nutty flavor.
Apples: The Star of the Show
When selecting apples for this recipe, consider varieties like Granny Smith or Honeycrisp for their balance of tartness and sweetness. Make sure to choose apples that are firm and crisp to ensure they hold up during baking. Feel free to mix different types for a more complex flavor!
Ingredient Preparation
Step 1 – Preparing the Apples
Begin by preheating your oven to 350°F (175°C). While it heats up, wash, core, and slice your apples into wedges. If you’d like, you can toss them in the lemon juice to preserve their color and add a zesty flavor.
Step 2 – Mixing the Topping
In a mixing bowl, combine the melted butter, oat flour, almond flour, brown sugar, white sugar, cinnamon, ginger, and a pinch of salt. Use a fork or your fingers to blend until the mixture resembles coarse crumbs. This will ensure a crisp topping that contrasts beautifully with the tender apples.
Step 3 – Assembling
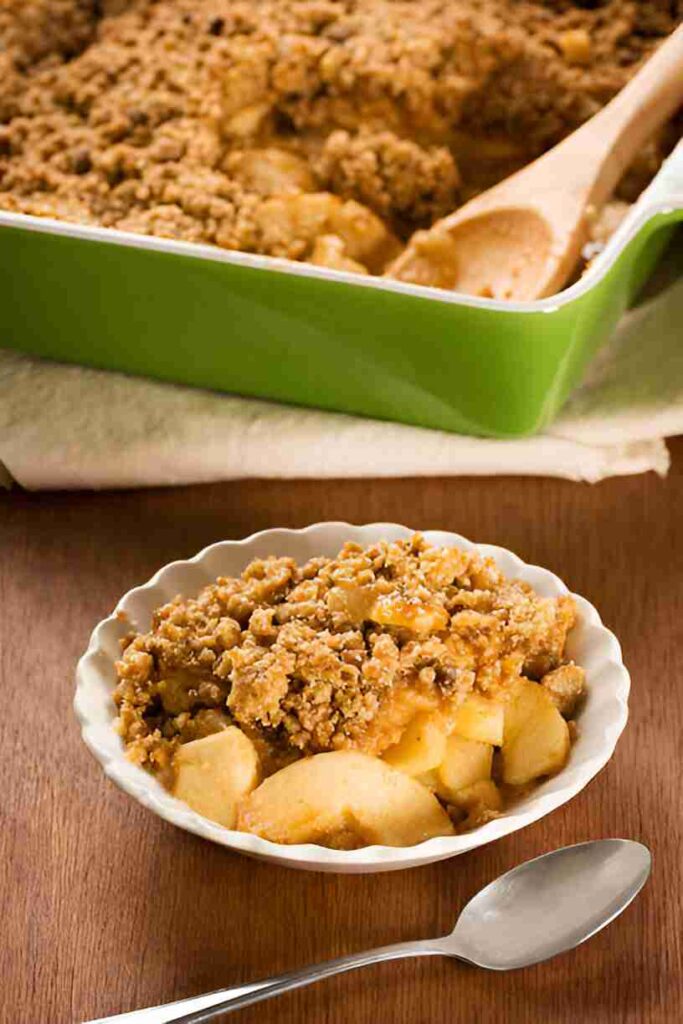
In a greased 9×13 inch baking dish, layer the apple wedges evenly. Sprinkle the topping mixture over the apples, ensuring even coverage. This will trap the juices and keep the bottom layer perfectly moist during baking.
Step-by-Step Cooking Instructions
Step 1 – Oven Preparation
With your oven preheated, ensure you’ve greased your baking dish well. This prevents sticking and allows for an easier cleanup after your delicious dessert is devoured.
Step 2 – Layering the Ingredients
Place the prepared apple wedges into the baking dish. You can even create aesthetic layers by arranging them in a circular pattern for a beautiful presentation. Afterward, sprinkle the crumbly topping over the apples evenly.
Step 3 – Baking Time
Bake the Apple Crisp in the preheated oven for 40 to 45 minutes. Keep an eye on it – you’ll know it’s ready when the apples are tender and the topping is golden brown, with a delightful aroma wafting through your kitchen.
Tips for an Even Tastier Version
Adding Extra Ingredients
For a unique twist, consider mixing in some chopped nuts such as walnuts or pecans. You can also enhance the flavor by adding dried fruits like raisins or cranberries. A splash of vanilla extract can elevate the entire dish, giving it a warm, inviting note.
Techniques to Enhance Flavor
Enhance the flavor even further by adding a pinch of nutmeg or a dash of allspice to your topping mixture. These spices complement the apples beautifully, offering warm undertones that celebrate the essence of fall.
Adjustments for Preferences
Whether you’re following vegan guidelines or a gluten-free lifestyle, adapt the recipe as necessary. Substitute butter with a plant-based alternative and ensure that the flour is from gluten-free sources while preserving the delightful taste of your Apple Crisp.
Recipe Variations and Adaptations
Vegetarian Option
Since Apple Crisp is naturally vegetarian, simply ensure that all your ingredients are pure and free of animal products for a wholesome dessert.
Gluten-Free or Low-Carb Option
To keep this dessert gluten-free, use certified gluten-free oat flour and experiment with a sugar substitute like erythritol for a low-carb version that doesn’t skimp on taste.
Other Adaptations
Feel free to embrace the seasons by experimenting with different fruits. In the summer, replace apples with peaches or berries to create a refreshing twist on the classic. For winter, consider using pears or even cranberries for a tart and tangy version.
Serving Suggestions
Salad or Soup Ideas
To balance the sweetness of the Apple Crisp, serve it alongside a light salad with arugula, goat cheese, and a tangy vinaigrette to cleanse the palate.
Hearty Sides
If you want a more filling meal, pair the dessert with hearty sides like homemade bread or roasted vegetables. The contrast in textures and flavors makes for a satisfying dining experience.
Drink Recommendations
Complement your meal with a warm cup of spiced cider or a rich cup of herbal tea. For those looking for something cooler, a light white wine or a refreshing mocktail featuring ginger ale and lemon also pairs beautifully with this dessert.
Storage and Reheating Tips
How to Store Leftovers
Store any leftovers in an airtight container in the refrigerator for up to three days. You can also freeze Apple Crisp for longer storage – simply wrap it tightly in plastic wrap and foil.
Reheating Techniques
For the best results, reheat your Apple Crisp in the oven at 350°F (175°C) for about 15 minutes to restore its crispy topping. Alternatively, you can microwave individual portions for about a minute, but be aware that this may make the topping softer.
Portioning Tips
When prepping for a gathering, consider cutting the crisp into serving sizes before storing it. This makes it easy to grab and reheat a portion or two when the craving strikes.
Nutritional Information and Benefits
Nutritional Values per Serving
Each serving of Apple Crisp contains approximately 300 calories, with 3 grams of protein and 4 grams of dietary fiber. The inclusion of apples adds beneficial antioxidants and vitamins, making it a guilt-free indulgence.
Ingredient Benefits
The primary ingredients – apples, oats, and almonds – are packed with vitamins, minerals, healthy fats, and fiber. Apples, in particular, promote digestive health and reduce the risk of chronic diseases.
Recommended Portions
A standard serving size for desserts is typically 1/2 to 1 cup, making it easy to enjoy without going overboard on calories while still satisfying your sweet tooth.
Common Mistakes to Avoid
Issue 1 – Overcooking the Apples
To avoid mushy apples, ensure you’re monitoring the baking time closely. You want them tender but still holding their shape, providing a pleasant contrast to the crunchy topping.
Issue 2 – Not Layering Tightly
When layering the apples, make sure they are evenly distributed to avoid cold spots during baking. Uneven layering may lead to some sections undercooking while others get too done.
Issue 3 – Making the Topping Too Wet
Be cautious with the liquid ingredients when preparing the topping. Aim for a crumbly texture; if it’s too wet, add a little more flour to balance it out, ensuring an enjoyable crunch.
Inspiring Conclusion
This Apple Crisp recipe is not just a delightful dessert; it’s a chance to bring family and friends closer together in the kitchen. Baking is a cozy activity that sparks creativity and joy. We encourage you to add your personal touch, experiment with flavors, and share your results with loved ones. After all, cooking is about making memories as much as it is about nourishing the body.
FAQ (Frequently Asked Questions)
1. Can I prepare this recipe in advance?
Yes! You can prepare the apples and topping separately and store them in the refrigerator. Simply combine and bake when you’re ready to serve.
2. What are the best substitutes for butter?
Coconut oil or unsweetened applesauce can be used as alternatives to butter, maintaining moisture while providing a healthier fat option.
3. Can I freeze Apple Crisp after baking?
Absolutely! Let it cool completely, then wrap tightly and freeze for up to three months.
4. How long does it take to bake?
Bake at 350°F (175°C) for about 40 to 45 minutes, or until the apples are tender and the topping is golden brown.
5. Will it still be good if made a day ahead?
Yes! In fact, many say it tastes even better the next day as the flavors meld together.
6. What types of apples should I use?
Granny Smith, Honeycrisp, and Fuji apples are great choices for their balance of sweetness and tartness.
7. Can I use other fruits in this recipe?
Certainly! Feel free to substitute apples with other fruits like peaches, pears, or berries for a delightful twist.
8. Is this recipe gluten-free?
To make it gluten-free, use gluten-free oat flour and ensure that all other ingredients are gluten-free labeled.
9. Can I make a smaller batch?
Yes, you can easily halve the recipe and use a smaller dish if you prefer less serving size.
10. What can I serve with Apple Crisp?
Serve with vanilla ice cream, whipped cream or a drizzle of caramel sauce for an indulgent finishing touch.
Now that you have the complete guide to preparing an irresistible Apple Crisp, gather your ingredients and get started on creating this delightful dish that promises to please everyone at the table! Happy baking!
Yogurt Cake: A Versatile Delight for Every Occasion
PrintApple Crisp: A Delicious Fall Dessert Recipe
A classic fall dessert with tender spiced apples and a crunchy oat topping, baked until golden and bubbly. Serve warm with vanilla ice cream for the ultimate comfort dessert.
- Prep Time: 20 minutes
- Cook Time: 45 minutes
- Total Time: 1 hour 20 minutes (including cooling)
- Yield: 8 servings 1x
- Category: Dessert
- Method: Baking
- Cuisine: American
- Diet: Vegetarian
Ingredients
- 1 stick of butter, melted
- 1 1/4 cups oat flour
- 1/4 cup almond flour
- 1 cup lightly packed brown sugar
- 1/2 cup white sugar
- 6 apples, cored and cut into wedges
- 2 teaspoons cinnamon
- 1/2 teaspoon ginger
- Juice of 1/2 lemon
- Pinch of salt
Instructions
- Prep apples: Preheat oven to 375°F (190°C). Toss apple slices with lemon juice in a large bowl.
- Make filling: Add brown sugar, flour, cinnamon, nutmeg, salt and vanilla to apples. Stir to coat, then transfer to a 9-inch square baking dish.
- Make topping: In a separate bowl, combine flour, oats, brown sugar, cinnamon and salt. Cut in butter with pastry cutter or fingers until mixture resembles coarse crumbs. Stir in nuts if using.
- Assemble: Sprinkle topping evenly over apples, pressing lightly.
- Bake: Bake 40-45 minutes until topping is golden and apples are bubbling at edges.
- Cool: Let rest 15 minutes before serving to allow juices to thicken.
Notes
- For best texture: Use a mix of tart and sweet apples
- Make ahead: Prepare up to 1 day in advance and refrigerate before baking
- Gluten-free option: Substitute 1:1 gluten-free flour blend
- Storage: Cover and refrigerate leftovers for up to 4 days
Nutrition
- Serving Size: 1/8 of recipe
- Calories: 320
- Sugar: 32g
- Sodium: 150mg
- Fat: 12g
- Saturated Fat: 7g
- Unsaturated Fat: 4g
- Trans Fat: 0g
- Carbohydrates: 53g
- Fiber: 4g
- Protein: 3g
- Cholesterol: 30mg


