

# Irresistibly Delicious Baked Gorgonzola Pears: A Cozy, Sweet & Savory Delight
## Introduction
Last autumn, I stumbled upon a recipe for Baked Gorgonzola Pears while rediscovering my grandmother's handwritten recipe book. It took me back to cozy family gatherings, where the sweet aroma of baked pears mingled with hearty laughter and crackling firewood. These delightful treats became a staple at our holiday table, and I still remember the joy on my family’s faces when they sank their forks into the tender fruit, revealing gooey, rich Gorgonzola nestled inside.
What makes these Baked Gorgonzola Pears stand out from others you might find? It’s the irresistible combination of sweet pears, tangy cheese, and crunchy nuts, creating a perfect harmony that dances on your palate. They're not just delicious; they evoke memories of love, comfort, and the joy of sharing good food with those we cherish.
In this post, I promise to guide you through making these scrumptious Baked Gorgonzola Pears, providing tips, variations, and all the little secrets that will help you impress your family and friends. Trust me, once you learn this recipe, it’ll become your go-to crowd-pleaser!
## What are Baked Gorgonzola Pears?
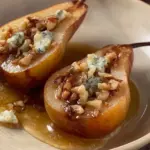
Baked Gorgonzola Pears are a delightful combination of ripe, juicy pears stuffed with a rich mixture of blue cheese (Gorgonzola), nuts, and honey, then baked until bubbly and aromatic. Originating from Italy, Gorgonzola cheese brings a distinct sharpness that perfectly complements the sweet, mellow flavor of fresh pears.
The texture is truly something to savor: the pears become tender and juicy while the cheese melts into a creamy blend that oozes from every bite. The walnuts or pecans add a satisfying crunch, making each mouthful a delicious contrast between sweet and savory.
These baked treats are perfect as an appetizer, dessert, or even a light meal. Whether you're hosting a dinner party or enjoying a cozy night in, these pears are a time-tested recipe that delivers warmth and happiness.
## Why You’ll Love This Recipe
1. **A Showstopper for Any Occasion**: Whether it's a holiday feast, a dinner party, or a cozy night at home, these Baked Gorgonzola Pears always earn gasps of delight. They look elegant and taste divine, making them the perfect showstopper that won’t break the bank.
2. **Simple and Quick to Make**: Even if you’re a beginner, this recipe is straightforward and doesn’t require complicated techniques. You'll spend just about 15-20 minutes of prep time — that’s it!
3. **Cost-Effective Luxury**: With just a handful of high-quality ingredients, you can create a dish that tastes gourmet without putting a dent in your wallet. Compared to what you’d find in restaurants, these pears are a fraction of the price and wholly satisfying.
4. **Infinitely Customizable**: You can easily adapt this recipe to your taste preferences—swap out Gorgonzola for another blue cheese or even goat cheese for a milder flavor. Add spices like cinnamon or nutmeg for a fall twist!
5. **Healthful Comfort Food**: With nutritious pears and heart-healthy nuts, this recipe is balanced enough to warrant a second helping! Plus, the sweet honey makes it feel like a treat while providing natural sweetness.
## Ingredient List
### For the Baked Gorgonzola Pears:
- **6 ripe pears** (Bartlett or Bosc are ideal for their sweetness and firmness)
- **50g walnuts or pecans** (coarsely chopped; look for fresh, unsalted nuts)
- **50g honey** (local or raw honey for depth of flavor)
- **150g Gorgonzola cheese** (or another blue cheese, at room temperature to make mixing easier)
- **Fresh thyme** for garnish (a light floral note that complements the dish beautifully)
### Ingredient Tips:
- Using high-quality ingredients really elevates the dish. I recommend **Stilton cheese** for a milder alternative or **Roquefort** for a stronger flavor.
- Ensure the pears are ripe but firm, as overly soft pears can turn mushy when baked.
- To streamline your prep, have the butter at room temperature before starting!
## Step-by-Step Instructions
1. **Preheat the Oven:** Preheat your oven to 375°F (190°C). This ensures that your pears will bake perfectly.
2. **Prepare the Pears:** Carefully cut the tops off the pears to create a small opening. Using a melon baller or a tablespoon, scoop out a bit of the flesh to make room for your filling. Be cautious not to cut through the bottom!
3. **Mix the Filling:** In a medium bowl, combine the crumbled Gorgonzola cheese, chopped walnuts or pecans, and honey. Mix thoroughly until the ingredients are well incorporated.
4. **Stuff the Pears:** Generously fill each pear with the Gorgonzola mixture, pressing down gently to pack it in.
5. **Bake the Pears:** Place the stuffed pears upright in a baking dish. Bake in the preheated oven for 15-20 minutes. The pears should be tender when pierced with a fork, and the cheese should be golden and bubbly.
6. **Garnish and Serve:** Remove from the oven, and sprinkle with fresh thyme before serving. The aromatic herb adds a lovely finishing touch!
### Chef’s Tip:
- **Timing Alert**: Keep an eye on the pears as they bake. Depending on their ripeness, they might take slightly less or more time.
## Expert Tips & Tricks
1. **Storage Recommendations**: Once cooled, these pears can be stored in an airtight container in the refrigerator for up to 3 days. Reheat in the oven for a few minutes to bring back their original deliciousness!
2. **Make-Ahead Instructions**: You can prepare the filling a day before and keep it in the fridge. When ready, simply stuff the pears and bake.
3. **Troubleshooting**: If the cheese is too crumbly, try adding a small spoonful of cream cheese for a creamier texture.
4. **Mistakes to Avoid**: Ensure that the pears are not overly ripe. Overripe pears can collapse during baking, leading to a mushier dish.
5. **Perfectly Bake**: To check for doneness, use a toothpick or fork. If it goes through with minimal resistance, they're ready!
## Serving Suggestions
These Baked Gorgonzola Pears shine as an appetizer, but they're equally delightful as a dessert. Pair them with a simple arugula salad drizzled with balsamic reduction for a stunning presentation. For a cozy evening in, serve them alongside a warm bowl of butternut squash soup.
You can plate them on rustic wooden boards sprinkled with edible flowers for a touch of elegance. They also make a thoughtful gift if you're heading to a friend’s get-together!
## Variations & Substitutions
- **Flavor Combinations**: Experiment by adding dried cranberries or figs for a fruity twist, or sprinkle with cinnamon for a warm, spiced flavor.
- **Dietary Restrictions**: For a dairy-free option, swap Gorgonzola with a well-flavored nut cheese. Gluten-free? You're already in luck—this recipe is naturally gluten-free!
- **Seasonal Variations**: Use seasonal toppings like a light drizzle of maple syrup in the fall or fresh summer berries in warmer months for a refreshing update.
## Nutrition & Storage Info
- **Prep Time**: 15 minutes
- **Cook Time**: 20 minutes
- **Total Time**: 35 minutes
- **Yield**: Serves 6
- **Estimated Calories**: Approximately 120 calories per serving
- **Storage Instructions**: Store leftovers in the refrigerator for up to 3 days or freeze for up to 2 months. Reheat in the oven before serving.
## FAQ Section
1. **Can I make these pears in advance?**
Yes, you can prepare the filling ahead of time and stuff the pears just before baking.
2. **What type of pears are best for baking?**
Bartlett or Bosc pears are ideal due to their sweetness and firmness.
3. **Can I substitute the Gorgonzola cheese?**
Absolutely! Feel free to use any blue cheese or goat cheese you prefer.
4. **How do I know when my pears are done?**
They should be tender when pierced with a fork, and the cheese should be golden and bubbly.
5. **What can I serve these with?**
They pair wonderfully with a light salad, warm soup, or as part of a cheese board.
6. **How do I store leftovers?**
Store in an airtight container in the fridge for up to 3 days.
7. **Can I freeze these pears?**
Yes, you can freeze them, but it’s best to do so before baking.
8. **Is this recipe gluten-free?**
Yes, this recipe is naturally gluten-free!
9. **Can I make these without nuts?**
Certainly! Just skip the nuts or replace them with seeds if you have nut allergies.
10. **What wine pairs well with this dish?**
A nice Riesling or a crisp white wine, such as Sauvignon Blanc, complements the sweet and savory flavors beautifully.
## Conclusion
Baked Gorgonzola Pears are truly a delightful dish that brings together the sweetness of pears and the richness of cheese, creating a memorable experience for anyone lucky enough to enjoy them. I encourage you to try this recipe and bring a touch of warmth and comfort to your table. Your loved ones will thank you, and I’d love to hear your thoughts or any variations you try in the comments!
If you enjoyed making Baked Gorgonzola Pears, be sure to check out my other recipes on the blog, like the Butternut Squash Risotto or my famous Spiced Apple Tart. Happy baking!
Baked Gorgonzola Pears
Delicious baked pears stuffed with rich Gorgonzola cheese, nuts, and honey, creating a perfect harmony of sweet and savory.
- Prep Time: 15 minutes
- Cook Time: 20 minutes
- Total Time: 35 minutes
- Yield: 6 servings 1x
- Category: Appetizer
- Method: Baking
- Cuisine: Italian
- Diet: Vegetarian
Ingredients
Scale
- 6 ripe pears (Bartlett or Bosc)
- 50g walnuts or pecans (coarsely chopped)
- 50g honey
- 150g Gorgonzola cheese (or another blue cheese)
- Fresh thyme for garnish
Instructions
- Preheat your oven to 375°F (190°C).
- Carefully cut the tops off the pears to create an opening and scoop out a bit of the flesh.
- In a medium bowl, combine the crumbled Gorgonzola cheese, chopped nuts, and honey.
- Fill each pear with the Gorgonzola mixture.
- Place the stuffed pears in a baking dish and bake for 15-20 minutes.
- Remove from the oven and sprinkle with fresh thyme before serving.
Notes
Store leftovers in an airtight container in the refrigerator for up to 3 days. Reheat in the oven before serving.
Nutrition
- Serving Size: 1 serving
- Calories: 120
- Sugar: 10g
- Sodium: 200mg
- Fat: 7g
- Saturated Fat: 3g
- Unsaturated Fat: 4g
- Trans Fat: 0g
- Carbohydrates: 15g
- Fiber: 2g
- Protein: 3g
- Cholesterol: 15mg


