
Delightfully Easy Sweet Italian Easter Bread: A Family Tradition Revived
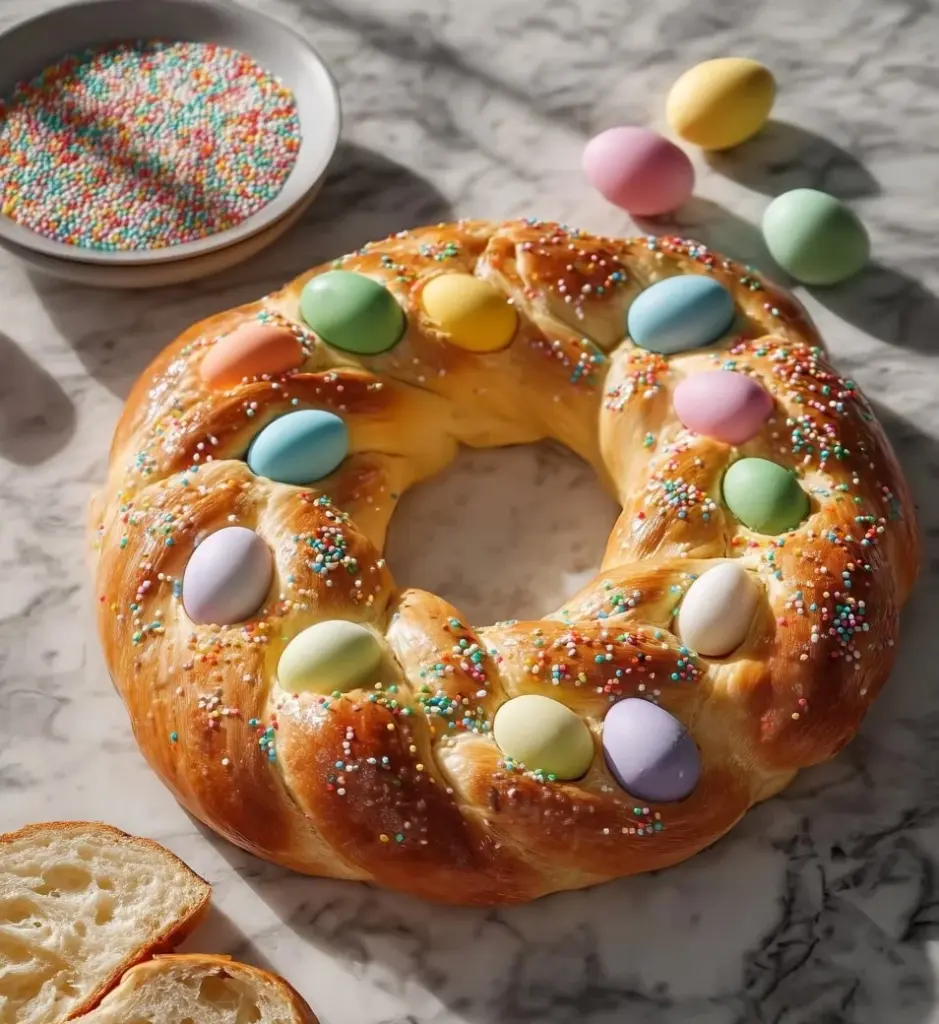
Easter is a special time of year—filled with blooming flowers, festive celebrations, and, of course, delectable treats! One memory that always warms my heart is the aroma of my grandmother’s Easy Sweet Italian Easter Bread wafting through her kitchen as we prepared for the holiday. It was more than just bread; it was a symbol of our family’s love and togetherness. I can still see the vibrant colored eggs nestled in the braided dough, a beautiful centerpiece for our Easter brunch table. Each bite was soft and sweet, just like the memories I hold dear.
What sets this Easy Sweet Italian Easter Bread apart from others is its enchanting blend of flavors and textures. Fluffy, slightly sweet, and rich with buttery goodness, this bread is not just a treat—it’s pure comfort. While many recipes can be intimidating, I promise that my version is accessible and simple enough for even the novice baker. I’ve tested it time and again, ensuring that it’s the perfect balance of flavors and easy to recreate with a little bit of love in your own kitchen. In this post, I’ll walk you through each step to make this delightful bread, including tips and tricks to make it your own. So roll up your sleeves, and let’s bake some memories together!
What Are Easy Sweet Italian Easter Breads?
Easy Sweet Italian Easter Bread has roots that run deep into Italian tradition. Often made to celebrate the resurrection of Christ, this bread symbolizes new life and is a staple in many Italian-American households during Easter. The recipe has been passed down through generations, each family adding their own twist. The sweet dough is typically braided and adorned with beautifully colored eggs, representing spring and renewal.
The taste is a delightful mix of mildly sweet, buttery, and slightly yeasty flavors, while the texture boasts a light, airy crumb that melts in your mouth. What makes this bread truly special is its incredible versatility. You can serve it as breakfast, alongside your favorite brunch dishes, or as a sweet snack later in the day. Easter wouldn’t be the same without this showstopper on the table!
Why You’ll Love This Recipe
Simplicity at Its Best: This Easy Sweet Italian Easter Bread is a straightforward recipe that does not require advanced baking skills. With just a few basic ingredients and simple techniques, you’ll create something truly captivating.
A Cost-Effective Choice: Why spend a fortune at the bakery when you can make this mouthwatering treat at home? The cost of ingredients is low, and you’ll absolutely save money while treating your loved ones to something delicious.
Customizable Delight: Want to add a bit of zest? Consider incorporating citrus zest or chopped nuts to vary the flavor. You can also swap out the colored eggs for sprinkles ‘just because’—this bread is all about personal expression!
Better than Store-Bought: Once you taste the homemade version, you’ll never want to go back to store-bought. The freshness, warmth, and love you’ll bake into this bread can’t be matched by anything on the shelves.
A Memory-Building Experience: This recipe isn’t just about the bread; it’s about the experience of making it together with family and friends. Creating traditions in the kitchen is what lasts a lifetime.
So, grab your apron, and let’s dive into this delightful recipe!

Ingredients for Easy Sweet Italian Easter Bread
- 4 cups all-purpose flour: Use high-quality flour for the best texture. I recommend King Arthur Flour for consistent results.
- 1 cup warm milk (about 110°F): Using warm milk aids in activating the yeast. You can substitute with non-dairy milk if needed.
- 1/2 cup sugar: This sweetness is essential for both flavor and activating the yeast.
- 1/2 cup butter, softened: For a rich taste, use unsalted butter at room temperature.
- 2 large eggs: For moisture and binding. The eggs should also be at room temperature; I recommend organic, free-range eggs for enhanced flavor.
- 1 packet (2 1/4 tsp) active dry yeast: Make sure it’s fresh for optimal rise.
- 1 teaspoon salt: Enhances the flavor and balances the sweetness.
- Colored Easter eggs (for decoration): Natural dye options include beet juice or turmeric if you’re looking for a more organic approach.
Prep Notes:
- Ensure your butter is softened to room temperature for easy mixing.
- If you have time, let your eggs sit out for about 30 minutes to maximize their temperature for better emulsification.

Step-by-Step Instructions
Activate the Yeast: In a small bowl, dissolve the yeast in warm milk. Let it sit for about 5 minutes until it froths up. This means the yeast is alive and ready to work its magic!
Mix Dry Ingredients: In a large mixing bowl, combine the flour, sugar, and salt. Whisk them together to incorporate air, which helps the bread rise.
Combine Ingredients: Add the softened butter, eggs, and the yeast mixture to the flour. Mix until a dough starts to form. It might look a bit scraggly initially, but that’s okay!
Knead the Dough: Transfer the dough to a floured surface and knead for about 5-7 minutes. You’re looking for a smooth, elastic texture—just like a baby’s bottom!
First Rise: Place the kneaded dough in a greased bowl, cover it with a damp cloth, and let it rise in a warm place for 1 hour or until it has doubled in size.
Shape the Dough: Once risen, punch the dough down to release gas. Divide it into three equal parts and roll each piece into a long rope—not too thin, but about a half-inch thick.
Braid It Together: Time to showcase your artistic side! Braid the three ropes together and place your beautiful creation on a baking sheet lined with parchment paper.
Egg Placement: Gently tuck colored eggs into the braid (sell them at the egg market—get creative!).
Second Rise: Now, preheat your oven to 350°F (175°C) while letting the dough rise for another 30 minutes. This will give you that perfect puffiness.
Bake: Bake the bread for 25-30 minutes, until it’s golden brown. What you’ll smell wafting from your oven will quite literally knock your socks off!
Cool Down: Let it cool before serving, and you’ll have a gorgeous centerpiece that your family won’t be able to resist.
Chef’s Tips:
- If the dough is too sticky while kneading, add flour a tablespoon at a time.
- You can cover the dough with plastic wrap to prevent drying during the rising process.
- Oven temperatures may vary—keep an eye on the bread after 20 minutes.
Expert Tips & Tricks
Storage Recommendations: Wrap leftover bread tightly in plastic wrap or store it in an airtight container at room temperature for up to 3 days.
Make Ahead Instructions: Prep the dough and let it rise, then punch it down and place it in the refrigerator for a slow rise overnight; just bring it back to room temperature before braiding.
Troubleshooting: If your dough isn’t rising, double-check the yeast’s expiration date and the milk’s temperature. It should be warm, not hot, as extreme heat kills the yeast.
Perfecting Texture: If you want an even softer bread, you can brush the top with egg wash before baking for a brilliant finish.
Variations: Experiment by adding dried fruit or citrus zest for added flavor—a personal touch that speaks to your taste.
Serving Suggestions
To make this Easter breakfast even more special, serve slices of Easy Sweet Italian Easter Bread with a side of creamy butter and a fresh fruit salad. You could pair it with your favorite coffee or a mimosa for that celebratory flair! Presentation is key—consider arranging your bread on a decorative platter with fresh flowers or rosemary sprigs to enhance the festive spirit.
Variations & Substitutions
- Flavors: Have fun with flavors! Consider adding chocolate chips, orange zest, or even a cinnamon swirl if you are feeling adventurous.
- Restrictions: For a gluten-free version, substitute all-purpose flour with a gluten-free flour blend; just be sure it’s a 1:1 ratio blend with xanthan gum for optimal results.
- Seasonal: Beyond Easter, you can create themed decorations with seasonal colors—think red, white, and blue for the Fourth of July or pastels for spring!
Nutrition & Storage Info
- Prep Time: 20 minutes
- Cook Time: 30 minutes
- Total Time: 1 hour 50 minutes (plus rising time)
- Yield: About 12 servings
- Estimated Calories: 220 calories per serving
- Storage Instructions: Store at room temperature in a cool, dry place for up to 3 days; for longer freshness, refrigerate up to 1 week or freeze for up to 3 months.
FAQ Section
Can I use instant yeast instead of active dry yeast?
Yes, you can! Just mix it directly with the dry ingredients and skip the activation step.What kind of milk can I use in this recipe?
Whole milk is best for flavor, but any milk or dairy-free alternative will work fine.Can I make it without eggs?
Yes, substitute eggs with applesauce (1/4 cup per egg) or a flax egg (1 tablespoon ground flaxseed mixed with 2.5 tablespoons of water) for a vegan option.Why is my bread dense?
Your dough might not have risen enough, or it could be over-kneaded, leading to gluten overdevelopment.What do I do if my yeast doesn’t foam?
If your yeast doesn’t froth when mixed with warm milk, it may be dead. Try again with fresh yeast.Can I freeze the bread after baking?
Absolutely! Wrap the cooled bread tightly in plastic or foil before freezing.What’s the best way to reheat leftover bread?
Reheat in the oven wrapped in foil at 300°F (150°C) for about 10-15 minutes until warmed through.Can I add toppings before baking?
Yes! A sprinkle of coarse sugar or slivered almonds makes for a delightful topping that adds a little crunch.How do I make a sweeter glaze for the bread?
Mix powdered sugar with a dash of milk or lemon juice until you reach the desired consistency for a sweet drizzle!What if I don’t have a stand mixer?
You can easily mix and knead the dough by hand; just be prepared for a workout!

Conclusion
This Easy Sweet Italian Easter Bread isn’t just a recipe; it’s a family tradition waiting to be born in your kitchen. The memories you’ll create while making this delightful bread will last a lifetime, just like mine with my grandmother. I encourage you to gather your loved ones, roll up your sleeves, and immerse yourself in this beautiful baking experience. Your feedback is incredibly valuable to me, so please share your thoughts or memories after trying this recipe. And if you’re craving more baking ideas, check out my blog for related recipes that will keep your kitchen filled with love and warmth!
Happy baking, and may your Easter be filled with joy, love, and perfectly sweet memories!


