

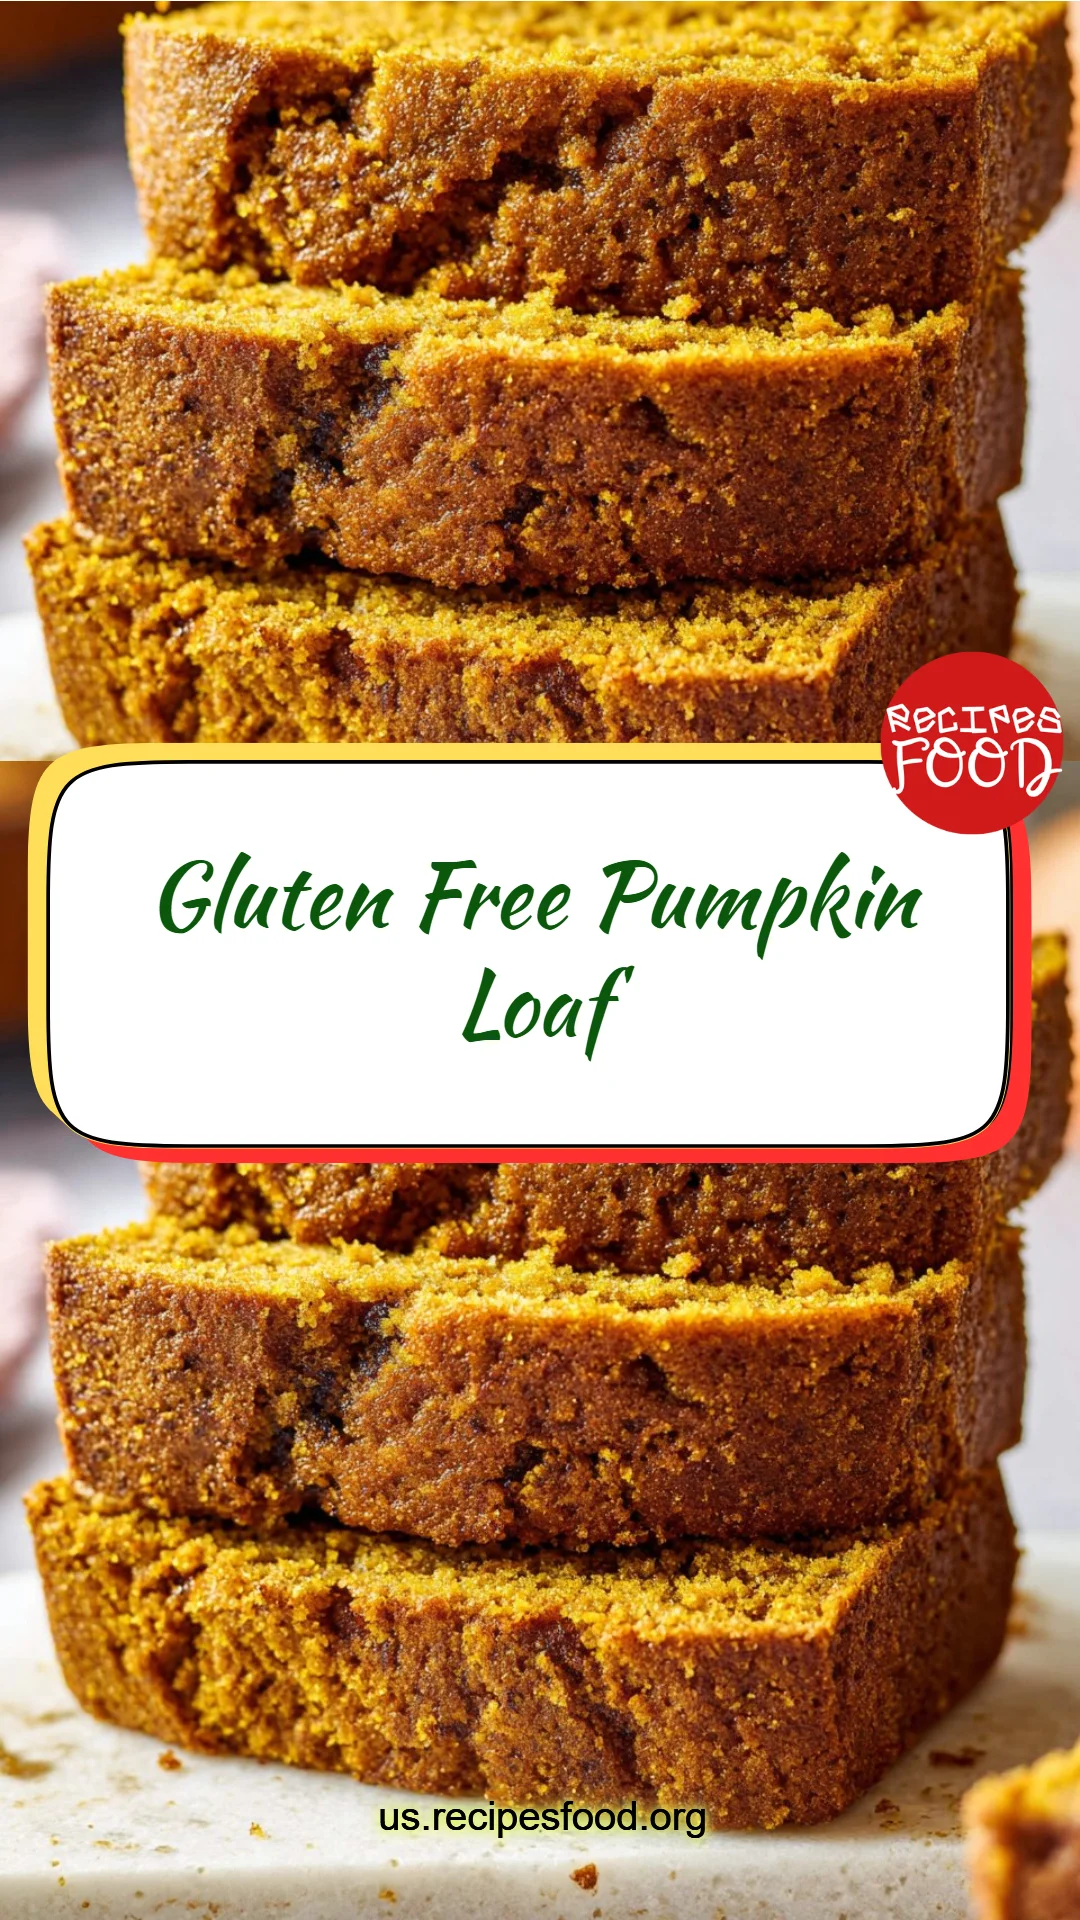
Delightfully Moist Gluten-Free Pumpkin Loaf: Your New Favorite Fall Treat!
As the leaves begin to change and the air turns crisp, there’s nothing that warms the heart quite like the smell of freshly baked goods wafting from the kitchen. I still remember my first attempt at baking a Gluten Free Pumpkin Loaf. It was a rainy Saturday afternoon, and I was desperate for a slice of that nostalgia-inducing pumpkin goodness that my grandmother used to make. This isn’t just any recipe; it’s the one that brings back memories of family gatherings and cozy evenings spent sipping spiced tea while indulging in a slice of moist loaf.
But what makes my Gluten Free Pumpkin Loaf stand apart from the rest? It’s all about harmony in flavor and texture. Unlike many gluten-free baked goods that can be dry or crumbly, this loaf is soft, airy, and full of pumpkin-spice magic that dances on your taste buds. I promise this recipe will become a cherished staple in your kitchen, providing not just a delicious treat, but also a comforting slice of home. So roll up your sleeves, grab your apron, and let’s dive into the world of gluten-free baking together!
What Are Gluten Free Pumpkin Loaves?
Gluten Free Pumpkin Loaf is essentially a moist, aromatic bread that celebrates the best flavors of fall. Originating from traditional pumpkin bread recipes, this gluten-free version allows those with dietary restrictions to indulge without compromising on taste or texture.
You can expect a sweet and spiced flavor profile, with notes of cinnamon and nutmeg mingling seamlessly with rich pumpkin. The texture is what truly sets it apart; it’s pillowy soft and impossibly moist, making each bite a wonderful experience. Whether enjoyed with your morning coffee, as a warm afternoon snack, or even at a festive gathering, these loaves are perfect for any occasion when you crave a slice of comfort.
So, when should you make this delightful treat? There’s no wrong time, but I particularly recommend it during the fall harvest season or when you want to impress guests at your next gathering. Trust me, it’ll be the star of the table!
Why You’ll Love This Recipe
Incredible Flavor: This Gluten Free Pumpkin Loaf is bursting with rich pumpkin flavor, enhanced with warm spices that evoke memories of cozy evenings. Forget bland store-bought alternatives; this loaf will have your family coming back for seconds!
Cost-Effective and Easy: This recipe is not only budget-friendly but also incredibly simple to whip up. With just a handful of ingredients, you can create a dessert that rivals anything from your favorite bakery—all for a fraction of the cost.
Versatility & Customization: Want to dress it up? Add chocolate chips, nuts, or dried fruits for an even heartier loaf. You can play around with ingredients based on what you have on hand, ensuring every loaf is uniquely yours.
Time-Saver: Perfect for those busy weeknights or holiday prep, this loaf can be made in under 10 minutes of active prep time. Then, let the oven work its magic while you catch up on your favorite show!
Feel-Good Comfort Food: There’s something incredibly rewarding about baking at home. It not only fills your kitchen with delightful aromas but also brings a sense of comfort and nostalgia that only homemade treats can provide.
Trust me, after you bake your first loaf, you’ll be hooked, and it might just become a seasonal tradition in your household!
Ingredients
Here’s what you’ll need to create your delicious Gluten Free Pumpkin Loaf:
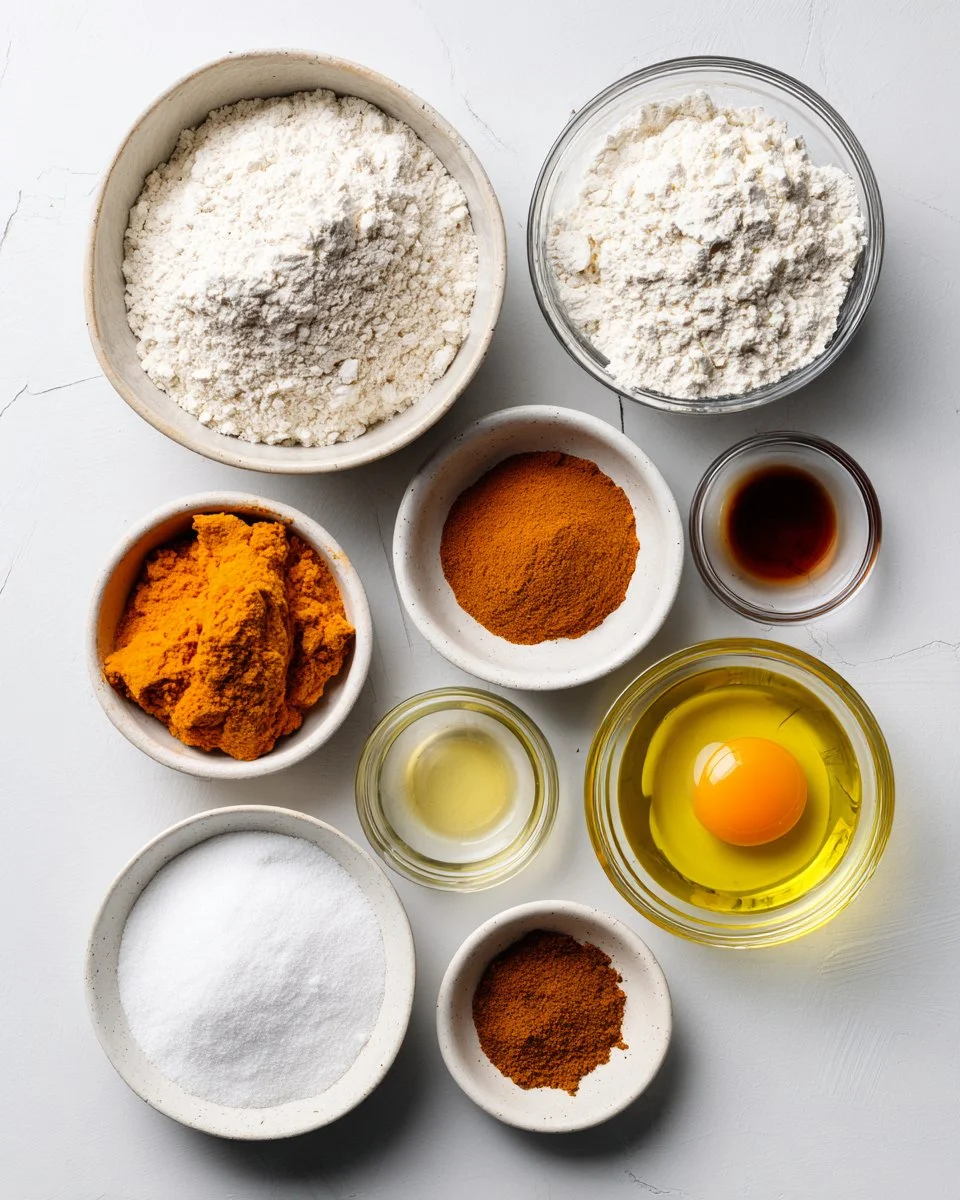
- 1 ½ cups gluten free all-purpose flour with xanthan gum (I recommend brands like Bob’s Red Mill or King Arthur Flour)
- 1 tbsp pumpkin pie spice (adjust to taste, see notes)
- 1 tsp baking powder
- ½ tsp baking soda
- ½ tsp salt
- 1 cup pumpkin puree (fresh or canned)
- 1 cup sugar (brown or granulated)
- ½ cup oil (olive, vegetable, or canola for richness)
- 1 large egg (room temperature for better emulsification)
- 1 tsp vanilla extract (for that lovely aroma)
Notes on Ingredient Quality/Substitutions:
- Flour: Ensure your gluten-free flour blend contains xanthan gum; if not, add an additional teaspoon for better structure.
- Pumpkin Spice: Feel free to make your own by mixing cinnamon, nutmeg, and ginger.
- Oil: I love using olive oil for its subtle flavor, but vegetable or canola oil is just as delightful.
- Sugar: Brown sugar will lend a deeper flavor and moisture compared to white sugar.
Stay tuned for tips on ingredient prep and best practices before we dive into baking!
Step-by-Step Instructions
Preheat the Oven: Start by preheating your oven to 350°F (175°C). This ensures even baking and allows your loaf to rise beautifully.
Prepare the Pan: Coat a 9 x 5 loaf pan lightly with cooking spray or line it with parchment paper. This will help you easily remove the loaf after it cools.
Combine Dry Ingredients: In a large mixing bowl, whisk together the gluten-free flour, baking powder, baking soda, pumpkin pie spice, and salt until well combined.
Mix Wet Ingredients: In a separate bowl, combine the pumpkin puree, sugar, egg, oil, and vanilla extract. Mix until smooth and creamy, ensuring everything is well blended.
Combine Mixtures: Gradually add the dry ingredients to the wet mixture, mixing until just combined. Over-mixing can lead to a denser loaf, so a few lumps are perfectly fine!
Transfer to Pan: Spread the batter evenly in the prepared loaf pan, smoothing the top.
Bake: Bake in the preheated oven for about 1 hour, or until a toothpick inserted in the center comes out clean. Keep an eye on the time; depending on your oven, you may need to bake it for an additional 5 to 10 minutes.
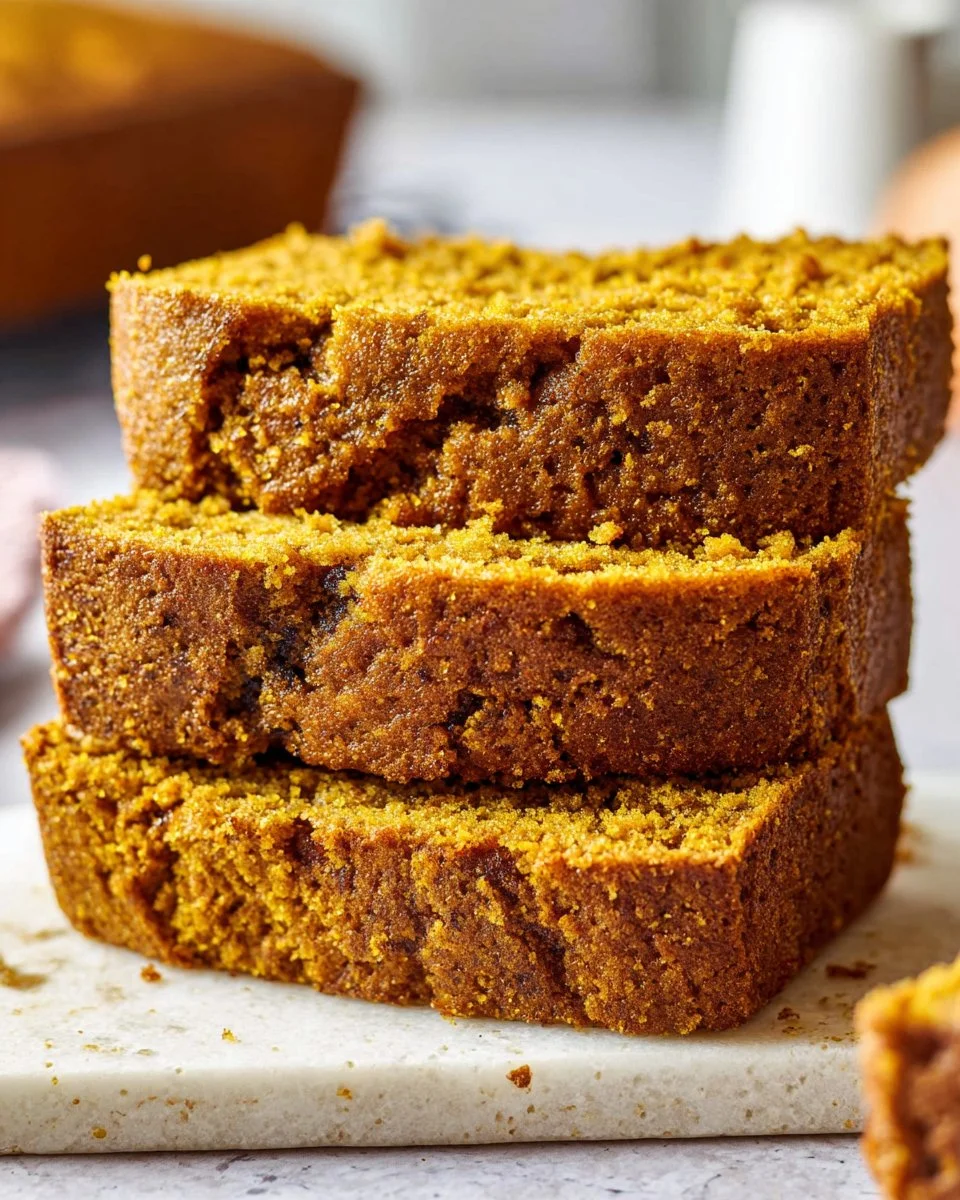
Cool the Loaf: Once done, remove the loaf from the oven and allow it to cool in the pan for about 15 minutes. Use a knife to gently loosen the sides before turning it out onto a wire rack.
Complete Cooling: Allow it to cool completely before slicing. This is crucial for best texture—trust me, the wait is worth it!
Chef’s Tips:
- Check doneness with the toothpick method: Don’t be afraid to take a peek after 50 minutes—ovens can vary!
- Storage tip: Cover the loaf with plastic wrap to maintain its moisture or store it in an airtight container once cooled.
Common mistakes to avoid:
- Mixing wet and dry ingredients too vigorously or for too long.
- Not preheating the oven: This is critical for the loaf to rise appropriately.
Expert Tips & Tricks
Ingredient Quality Matters: For the tastiest results, always use fresh spices and high-quality pumpkin puree. It makes a world of difference!
Storing Your Loaf: This Gluten Free Pumpkin Loaf can be stored at room temperature in an airtight container for up to 3 days. For longer storage, freeze slices wrapped tightly in plastic wrap for up to 3 months.
Make-Ahead Instructions: You can prepare the batter in advance and refrigerate it (covered) for up to 24 hours before baking. Just let it sit at room temperature for about 30 minutes before pouring it into the pan and baking.
Troubleshooting: If your loaf is too dense, it might be due to compacting the flour or overmixing. A light hand is key!
Baking Time Adjustments: Always start checking for doneness a few minutes early—ovens can vary greatly!
Customization Notes: Feel free to substitute half the oil with unsweetened applesauce for a lower-fat version without sacrificing taste!
Serving Suggestions
Enjoy your Gluten Free Pumpkin Loaf on its own, or elevate it with a dollop of whipped cream or a spread of creamy butter. It pairs beautifully with a warm cup of spiced chai or coffee, making it perfect for brunch or as an afternoon pick-me-up.
If you’re looking to impress at a gathering, consider serving it on a pretty wooden board with additional toppings, such as toasted nuts, honey drizzle, or seasonal fruits. It’s sure to be a conversation starter!
Variations & Substitutions
Flavor Combinations: Spice it up by adding chocolate chips or dried cranberries for an added burst of sweetness and texture.
Dietary Adaptations: If you’re vegan, substitute the egg with flaxseed meal mixed with water (1 teaspoon flaxseed meal to 2.5 tablespoons water) which works wonders as a binding agent.
Seasonal Twists: For a festive touch, consider adding chopped walnuts or pecans for a delightful crunch or a hint of maple syrup in place of sugar for a deeper flavor.
Different Flours: If you don’t have a gluten-free blend, you could experiment with almond flour or oat flour, but expect a slight variation in texture.
Nutrition & Storage Info
- Prep Time: 10 minutes
- Cook Time: 1 hour
- Total Time: 1 hour 10 minutes
- Yield: Approximately 8 slices
- Estimated Calories: About 200 calories per slice
- Storage Instructions: Room temperature for 3 days, refrigerate for a week, or freeze for up to 3 months.
FAQ Section
Can I use fresh pumpkin instead of canned?
Yes! Just make sure to cook and puree it properly before adding it to your recipe.What can I do if my loaf is too dense?
This may be a result of too much flour or overmixing. Be sure to measure flour accurately and mix just until combined.Can I make this nut-free?
Absolutely! Just omit any nuts from the recipe, and you should still achieve a delicious loaf.How can I add sweetness without sugar?
You could swap out sugar for ripe bananas or applesauce, but keep in mind that it may alter the taste slightly.How should I store leftover slices?
Wrap them in plastic wrap and store them in an airtight container to lock in moisture.Can I add other spices?
Yes! Feel free to experiment with cardamom or ginger to customize the flavor to your taste.Is this loaf suitable for diabetics?
It’s best to consult with a healthcare provider regarding specific dietary needs, but consider reducing the sugar or using sugar alternatives.Can I double this recipe?
Sure! Just ensure you’re baking it in batches or have appropriate-sized pans to prevent overflow.What’s the best way to slice the loaf?
Use a serrated knife to make cutting easier and ensure clean slices.Can I use other vegetables like zucchini?
While this recipe is meant for pumpkin, you could try substituting grated zucchini for a different taste profile, but it will change the loaf’s character.
Conclusion
The Gluten Free Pumpkin Loaf is not just a recipe; it’s a delightful celebration of the season, perfect for creating lasting memories with friends and family. Each bite of this moist, flavorful loaf brings home the essence of fall, comfort, and warmth. I encourage you to give this recipe a try—you won’t regret it!
I’d love to hear how your baking adventure goes! Comments, feedback, or any variations you try are always welcome. And if you’re looking for more scrumptious recipes, don’t hesitate to explore other delightful offerings on the blog. Happy baking!
Delightfully Moist Gluten-Free Pumpkin Loaf
A moist and flavorful gluten-free pumpkin loaf that captures the essence of fall with rich pumpkin flavor and warm spices.
- Prep Time: 10 minutes
- Cook Time: 60 minutes
- Total Time: 70 minutes
- Yield: 8 slices 1x
- Category: Dessert
- Method: Baking
- Cuisine: American
- Diet: Gluten-Free
Ingredients
- 1 ½ cups gluten free all-purpose flour with xanthan gum
- 1 tbsp pumpkin pie spice
- 1 tsp baking powder
- ½ tsp baking soda
- ½ tsp salt
- 1 cup pumpkin puree
- 1 cup sugar (brown or granulated)
- ½ cup oil (olive, vegetable, or canola)
- 1 large egg (room temperature)
- 1 tsp vanilla extract
Instructions
- Preheat the oven to 350°F (175°C).
- Prepare a 9 x 5 loaf pan with cooking spray or parchment paper.
- Combine the gluten-free flour, baking powder, baking soda, pumpkin pie spice, and salt in a bowl.
- Mix the pumpkin puree, sugar, egg, oil, and vanilla extract until smooth.
- Combine the dry ingredients with the wet mixture, stirring until just combined.
- Transfer the batter to the prepared loaf pan.
- Bake for about 1 hour, or until a toothpick comes out clean.
- Cool the loaf in the pan for 15 minutes, then transfer to a wire rack to cool completely.
Notes
For a lower-fat loaf, substitute half the oil with unsweetened applesauce. Store in an airtight container for up to 3 days.
Nutrition
- Serving Size: 1 slice
- Calories: 200
- Sugar: 10g
- Sodium: 210mg
- Fat: 9g
- Saturated Fat: 1g
- Unsaturated Fat: 8g
- Trans Fat: 0g
- Carbohydrates: 36g
- Fiber: 2g
- Protein: 3g
- Cholesterol: 24mg


