
Spooktacular Cheesy Halloween Breadstick Bones: A Festive Treat for Your Haunted Table
As the leaves start to turn and the air gets that delightful crispness, my excitement for Halloween kicks into high gear. Growing up, my family had an annual Halloween gathering filled with costumes, spooky decorations, and, of course, festive treats. This year, I wanted to recreate those cherished memories with something both whimsical and delicious: Cheesy Halloween Breadstick Bones! Picture this: freshly baked, cheesy breadsticks shaped like bones, dipped in zesty marinara sauce. My mouth is watering just thinking about them!
What makes these bad boys special isn’t just their spooky appearance; it’s the ooey-gooey cheese that stretches with every bite and the warm, buttery flavor that brings comfort just like my childhood Halloweens. Plus, they’re quick and easy to make, even for novice bakers. Unlike store-bought options that can be overly processed or lack that homemade touch, these breadstick bones come out golden, soft, and utterly delightful. In this blog post, I’ll take you step-by-step through the recipe, sharing anecdotes, cooking tips, and ways to make this dish your own. Trust me, your friends and family will be haunting your kitchen for more!
What Are Cheesy Halloween Breadstick Bones?
The origin of Cheesy Halloween Breadstick Bones is a tale that echoes through my memories from childhood to adulthood. I remember the first time I saw breadsticks shaped like bones—it was at a Halloween potluck, and I was completely enchanted! These delicious snacks bring the spirit of Halloween right to your dining table while delivering a cheesy, satisfying bite.
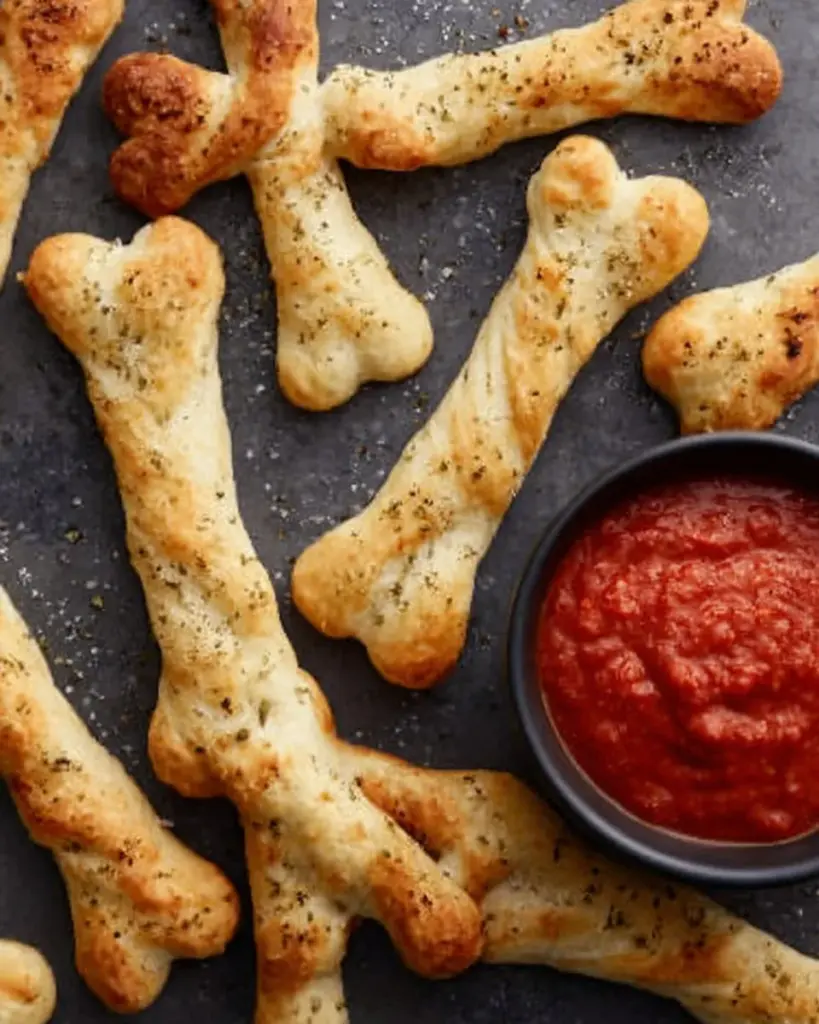
They feature a chewy texture, a buttery exterior, and are lavished with melted mozzarella and Parmesan cheese. What sets them apart from your standard breadsticks is, of course, their ghoulish shape and the fun of dipping them into a flavorful marinara sauce. Cheesy Halloween Breadstick Bones are perfect for Halloween parties, trick-or-treat gatherings, or even just a cozy night at home watching spooky movies. Anytime you want to infuse a little Halloween spirit into your kitchen, these bone-shaped breadsticks will do just the trick!
Why You’ll Love This Recipe
Fun for All Ages: One of the best things about making Cheesy Halloween Breadstick Bones is the joy you can see on everyone’s faces as they help shape the dough. Kids and adults alike will love getting creative—it’s a fun way to bond and embrace the Halloween spirit together!
Cost-Effective: When you compare the cost of making these cheesy snacks at home to buying them from a restaurant or store, you’ll be pleasantly surprised. With just a few simple ingredients, you can create a batch of delicious, homemade treats for a fraction of the cost.
Customization Galore: The beauty of this recipe lies in its versatility. You can easily adjust it to your taste preferences by adding herbs, spices, or even a hint of garlic powder to the dough. Add toppings like pepperoni slices for a spookier effect or sprinkle on some red pepper flakes for a little kick—unleash your creativity!
Quick and Easy: Even if you’re pressed for time, these Cheesy Halloween Breadstick Bones only take about 30 minutes from start to finish. Perfect for last-minute parties, movie nights, or even a cheesy snack for the kids.
A Spectacular Presentation: Last but not least, the presentation is a show-stopper! These breadsticks are not only delicious; they’re visually appealing and perfect for impressing your guests or setting the mood for Halloween festivities.
Ingredients
For Cheesy Halloween Breadstick Bones, you’ll need the following ingredients:
- All-purpose flour (for dusting) – A little sprinkle will help prevent sticking as you shape the dough. Use a high-quality brand for the best results.
- 1 pound pizza dough – Store-bought or homemade, either option works! If using store-bought, let it sit at room temperature for about 30 minutes before shaping.
- 2 tablespoons unsalted butter (melted) – For brain-churning buttery goodness. I recommend using European-style butter for an extra rich flavor!
- ½ cup grated Parmesan cheese – Adds a delicious nutty flavor and delightful texture. Grate your own for the freshest taste.
- 1 cup shredded mozzarella cheese – The stretchy, melty cheese that makes these breadsticks truly divine! I find that whole milk mozzarella works best.
- Marinara sauce (for dipping) – A tangy companion to your cheesy treats. Opt for your favorite store-bought brand, or make a homemade version for a personal touch.
Prep Notes: Ensure your pizza dough is at room temperature for easy handling. Let the melted butter cool slightly before brushing it on the breadsticks.
Step-by-Step Instructions
Preheat the Oven
- Set your oven to 375°F (190°C) and let it preheat while you prepare your baking sheets. This ensures even cooking and a golden finish.
Shape the Dough
Take your pizza dough and divide it into 10 equal portions. Roll each piece into a rope about 8 inches long. Don’t fret if they don’t all look identical; rustic is part of the charm! To create the signature bone effect, make the ends slightly thicker than the center. This little detail goes a long way in the aesthetics.
Place the shaped dough onto the prepared baking sheets, lined with parchment paper, leaving some space between each piece to allow room for expansion as they bake.
Snip the Ends
- Using kitchen scissors, make two small cuts (about 1 inch deep) on both ends of each dough rope. Gently pull and stretch these cut pieces apart to create the “bone” ends. This technique gives that cartoonish bone look that’s sure to delight!
Brush and Bake
Melt the butter, and using a pastry brush, coat each breadstick generously. You want that buttery goodness to seep into every crevice! Sprinkle the grated Parmesan cheese over the top for an added flavor boost.
Bake for about 15 minutes, or until the breadsticks begin to turn golden and your kitchen smells heavenly. Keep an eye on them—oven temperatures can vary, and we don’t want them overcooked!
Add Mozzarella
- After 15 minutes, remove the breadsticks from the oven. Sprinkle shredded mozzarella cheese evenly over each one, then return them to the oven. Bake for another 5 to 7 minutes, or until the mozzarella has melted beautifully and is bubbling.
Serve
- Once the breadsticks are out of the oven, serve them warm with a side of marinara sauce for dipping. Enjoy the spooky, cheesy snack while it’s hot!
Chef’s Tips
- If you want extra flavor, consider adding garlic powder to your butter before brushing it on the breadsticks.
- For crispier breadsticks, bake them a little longer but keep an eye on them to prevent burning.
- Enjoy the little imperfections; they’re what make homemade food special!
Expert Tips & Tricks
Storage Recommendations: These breadsticks are best enjoyed fresh but can be stored in an airtight container in the refrigerator for up to 3 days. Reheat in the oven to bring back that crispy texture.
Make-Ahead Instructions: You can shape the bones and refrigerate them uncooked for up to 24 hours. Brush them with butter and add cheese just before baking for fresh-baked goodness.
Troubleshooting Common Problems: If your dough isn’t rising, it might be because your yeast was expired or the dough was too cold. Always ensure the dough is at room temp and check your yeast’s expiration date.
Experiment with Flavors: Try using herb-infused olive oil instead of butter for an aromatic twist, or add some dried oregano or basil to the dough for depth.
Freezing Instructions: You can also freeze the shaped, uncooked dough for up to 2 months. Just thaw overnight before baking!
Serving Suggestions
These Cheesy Halloween Breadstick Bones are perfect for parties, gatherings, or a cozy night in. Pair them with a vibrant salad to balance out the richness, or some fruit skewers for a fun touch. For presentation, arrange your breadsticks in a skull-shaped platter or a cauldron for an extra spooky vibe. They make an adorable addition to any Halloween feast!
Variations & Substitutions
- Different Cheese Options: Mix in your favorite cheeses—cheddar or pepper jack can add a spicy twist!
- Herbs and Spices: Considering making them garlic and herb breadsticks? Just mix in dried herbs such as rosemary, thyme, or Italian seasoning into the dough.
- Dietary Adaptations: For gluten-free versions, try a gluten-free pizza dough and ensure that all other ingredients are gluten-free as needed.
Nutrition & Storage Info
- Prep Time: 10 minutes
- Cook Time: 20 minutes
- Total Time: 30 minutes
- Yield: Approximately 10 breadsticks
- Estimated Calories (per serving): 150-200
- Storage: Keep at room temperature for a few hours, then refrigerate for up to 3 days or freeze for up to 2 months.
FAQ Section
1. Can I use homemade pizza dough?
Absolutely! Homemade pizza dough works wonderfully. Just allow it to rise properly before shaping.
2. What can I use instead of marinara sauce?
Feel free to dip these treats in ranch dressing, garlic butter, or your favorite pizza sauce.
3. Can I make these in advance?
Yes! Prepare the dough ahead of time and bake them right before serving.
4. What if I want to make them spicy?
Add crushed red pepper flakes to the dough or sprinkle it on top for an extra kick!
5. How do I store leftovers?
Store in an airtight container in the fridge or freeze them for longer storage.
6. Can I use different shapes?
Of course! Get creative and experiment with different shapes—witches’ fingers or ghostly figures would be fun!
7. How can I make these vegan?
Substitute vegan butter for the melted butter, and use vegan cheese instead of mozzarella and Parmesan.
8. What’s the best way to reheat these?
Reheat in the oven for a few minutes at 350°F to regain their crispness!
9. Can I use pre-shredded cheese?
Yes, though I recommend using block cheese and shredding it yourself for the best melting quality and flavor.
10. Can I double the recipe?
Definitely! Just make sure your baking sheets are large enough to accommodate all the breadsticks, or bake in batches!
Conclusion
There you have it—Cheesy Halloween Breadstick Bones that are not only a delicious snack but also a fantastic way to create spooky memories with loved ones. Given their easy preparation and fabulous execution, I promise you’ll be making these year after year. I can’t wait to hear how your batch turns out, so be sure to leave a comment or share your photos! And while you’re here, don’t forget to check out my other Halloween-themed recipes on my blog. Happy haunting! 🎃🖤
PrintCheesy Halloween Breadstick Bones

Delicious cheesy breadsticks shaped like bones, perfect for Halloween gatherings.
- Prep Time: 10
- Cook Time: 20
- Total Time: 30
- Yield: 10 breadsticks 1x
- Category: Appetizer
- Method: Baking
- Cuisine: American
- Diet: Vegetarian
Ingredients
- All-purpose flour (for dusting)
- 1 pound pizza dough (store-bought or homemade)
- 2 tablespoons unsalted butter (melted)
- ½ cup grated Parmesan cheese
- 1 cup shredded mozzarella cheese
- Marinara sauce (for dipping)
Instructions
- Preheat your oven to 375°F (190°C).
- Divide the pizza dough into 10 equal portions and roll each into an 8-inch rope, making the ends thicker to create a bone shape.
- Place the shaped dough on parchment-lined baking sheets with space between each piece.
- Make two small cuts on both ends of each dough rope, stretching the cut pieces apart to form bone ends.
- Brush each breadstick with melted butter and sprinkle grated Parmesan cheese on top.
- Bake for 15 minutes until golden, then remove and sprinkle shredded mozzarella cheese over each before baking for an additional 5-7 minutes until melted.
- Serve warm with marinara sauce for dipping.
Notes
For extra flavor, add garlic powder to the butter. Store leftovers in an airtight container in the refrigerator for up to 3 days.
Nutrition
- Serving Size: 1 breadstick
- Calories: 200
- Sugar: 1g
- Sodium: 300mg
- Fat: 10g
- Saturated Fat: 4g
- Unsaturated Fat: 5g
- Trans Fat: 0g
- Carbohydrates: 24g
- Fiber: 1g
- Protein: 8g
- Cholesterol: 15mg


