
Discover the Magic of Dutch Apple Pie: A Timeless Classic Reimagined
There’s nothing quite like the aroma of freshly baked Dutch Apple Pie wafting through the house. It brings back vivid memories of family get-togethers, where laughter mingled with the sweet scent of cinnamon and warm apples. I remember huddling in my grandmother’s kitchen, her hands expertly rolling dough while I eagerly awaited that first slice.
What makes Dutch Apple Pie so special? For me, it’s the combination of luscious, spiced apples and a crunchy streusel topping that dances on your taste buds. This recipe elevates that nostalgic comfort food by incorporating high-quality ingredients and a few tricks I picked up over the years. It’s not just pie; it’s a slice of home, made with love.
In this blog post, I promise to guide you through my tried-and-true Dutch Apple Pie recipe. You’ll learn how to achieve that perfect balance between sweetness and spice, create a flaky crust, and give it a gourmet touch with a delicious streusel topping. So, roll up your sleeves, and let’s make some memories (and amazing pie) together!
What Are Dutch Apple Pies?
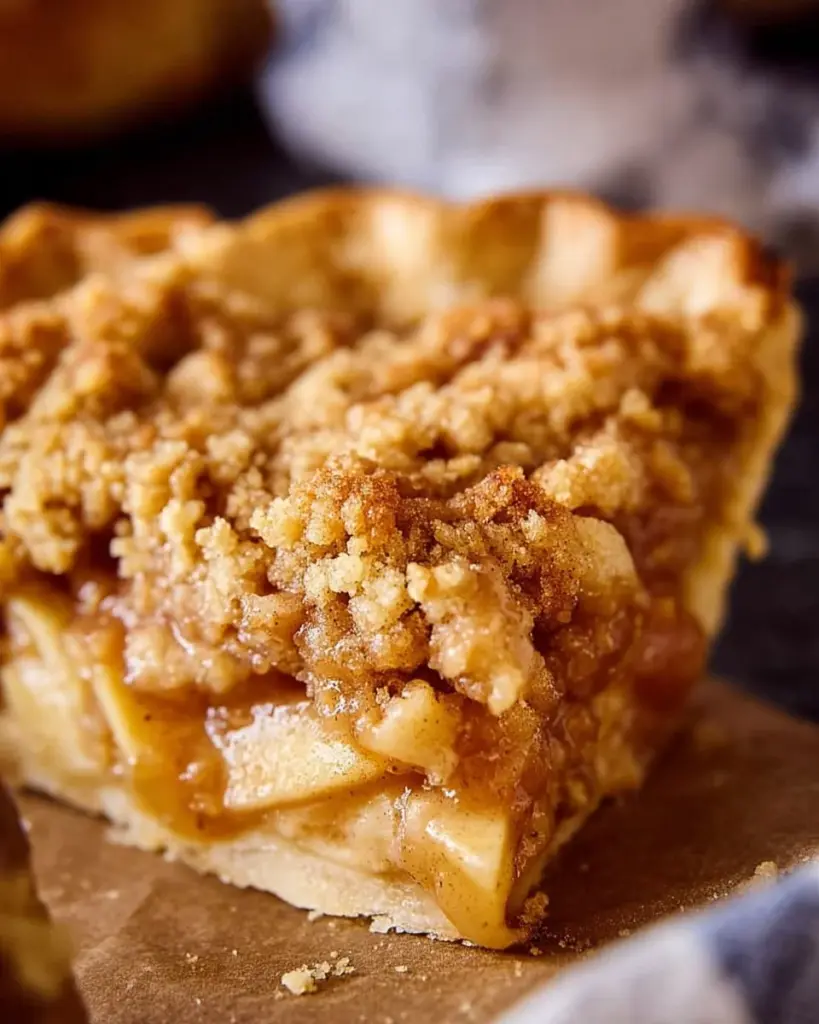
Dutch Apple Pies have a rich history, dating back to the Netherlands, where they were originally created. Unlike their American counterparts, which often feature a solid top crust, Dutch Apple Pies showcase a crumbly streusel topping that adds texture and bursts of flavor. The classic combination of tart apples, sugar, and warming spices creates a delightful contrast between the tender filling and crispy topping.
The taste and texture of a good Dutch Apple Pie is a perfect blend of sweet and tangy, with a buttery crust that crumbles just right. Each bite offers a little bit of nostalgia and a lot of comfort. Perfect for family gatherings, holidays, or just a cozy evening at home, this pie is a crowd-pleaser sure to impress. Whether it’s a cold winter night or a sunny afternoon, Dutch Apple Pie is a warm embrace in dessert form.
Why You’ll Love This Recipe
Unrivaled Flavor: Say goodbye to the bland, store-bought varieties! This homemade Dutch Apple Pie recipe bursts with the vibrant flavors of fresh apples complemented by just the right amount of sweetness and spice. You’ll taste the difference with every bite.
Cost-Effective: Baking this pie at home is not only more enjoyable—it’s also easier on your wallet. You can create a pie that serves eight for a fraction of the price of those fancy bakery versions. Plus, you can control the ingredients.
Customization: Feel free to add your personal spin—mix in some cranberries for a touch of tartness or sprinkle in some chopped nuts for extra crunch. This recipe welcomes creativity and can adapt to suit any preference.
Easy to Follow: With straightforward steps and simple ingredients, this recipe is perfect for bakers of all skill levels. I provide detailed instructions and tips to ensure everyone can enjoy the process—and the delicious results!
Quality Time: There’s something therapeutic about baking. As you slice apples and mix dough, you’ll find joy in the meditative repetition that reminds you that good things take time—and they often taste better when shared.
Ingredients
To make this delicious Dutch Apple Pie, gather the following ingredients:
For the Filling:
- 6 to 8 cups of sliced apples (I love using Granny Smith for their tartness, or Honeycrisp for sweetness)
- 1 cup granulated sugar
- 2 tablespoons lemon juice (to brighten the flavor)
- 1 teaspoon ground cinnamon
- 1/4 teaspoon ground nutmeg
- 1 tablespoon all-purpose flour (to thicken the filling)
- 1 tablespoon butter (for dotting)
For the Crust:
- 1 package of refrigerated pie crusts (a time-saver! Make sure to let them sit at room temperature for about 15 minutes before rolling, or feel free to use your favorite homemade pie crust recipe)
For the Streusel Topping:
- 1/2 cup all-purpose flour
- 1/2 cup brown sugar
- 1/2 cup rolled oats (adds a delicious texture)
- 1 teaspoon ground cinnamon
- 1/4 teaspoon salt
- 1/2 cup cold butter (cut into small pieces for the streusel)
Note: Quality matters! Organic apples and real butter make a noticeable difference. If you have dietary restrictions, you can easily substitute with gluten-free flour or opt for a butter alternative.
Step-by-Step Instructions
Preheat the Oven: Preheat your oven to 425°F (220°C). This initial high temperature helps create a golden crust.
Prepare the Apple Filling: In a large bowl, toss the sliced apples with granulated sugar, lemon juice, cinnamon, nutmeg, and 1 tablespoon of flour. Allow the mixture to sit for about 15 minutes to let the flavors meld.
Roll Out the Pie Crust: Unroll the pie crust and fit it into your pie dish, letting any excess hang over the edge. Pour the apple mixture into the crust and dot with small pieces of butter.
Make the Streusel Topping: In a separate bowl, mix 1/2 cup flour, brown sugar, rolled oats, cinnamon, and salt. Cut in the cold butter using a pastry cutter or your fingers until the mixture resembles coarse crumbs.
Assemble the Pie: Sprinkle the streusel mixture evenly over the apple filling.
Bake: Bake in the preheated oven for 15 minutes to get the crust started on becoming flaky. Then, reduce the temperature to 350°F (175°C) and bake for another 30-35 minutes. Keep an eye on it—the pie should be bubbly and golden brown, and the apples tender.
Cool and Serve: Allow your pie to cool slightly before indulging. Trust me, it’s hard to wait, but the flavors will be better once it settles!
Chef’s Tip: If the crust edges begin to brown too quickly, cover them with aluminum foil.
Expert Tips & Tricks
- Apple Choices: Mix different apple varieties for a more complex flavor profile. A combination of tart and sweet works wonderfully!
- Don’t Skip the Streusel: This is what sets Dutch Apple Pie apart. The oats add a chewiness that perfectly complements the filling.
- Storage: Store any leftover pie at room temperature for up to 2 days, or refrigerate for up to 5 days. To freeze, wrap tightly in plastic wrap and it can last for up to 3 months.
- Make Ahead: You can prepare the apple filling and streusel topping a day before; just assemble and bake when you’re ready!
- Troubleshooting: If the pie is too watery, cook the filling a bit longer on the stove, or increase the flour a tad.
Serving Suggestions
Dutch Apple Pie is divine when served warm, especially with a scoop of vanilla ice cream or a dollop of freshly whipped cream on top. For a touch of elegance, sprinkle some cinnamon on the ice cream just before serving. It’s perfect for family gatherings, holidays, or simply as a weekend treat.
Variations & Substitutions
- Spice it Up: Add a pinch of ginger or allspice for a warm kick.
- Seasonal Options: Try adding sliced pears or cranberries for a festive twist during the holidays.
- Healthier Versions: Use coconut sugar instead of brown sugar, or substitute some of the butter with applesauce for a lighter option.
Nutrition & Storage Info
- Prep Time: 30 minutes
- Cook Time: 45-50 minutes
- Total Time: About 1.5 hours
- Yield: About 8 servings
- Estimated Calories: Approximately 320 calories per slice
- Storage: Keep at room temperature for up to 2 days, in the fridge for up to 5 days, or freeze for up to 3 months.
FAQ Section
Can I use frozen apples?
Yes! Just thaw them and drain excess moisture before using.What should I serve with Dutch Apple Pie?
It pairs beautifully with ice cream, whipped cream, or even a hard cider on the side.Can I make the crust from scratch?
Absolutely! A homemade crust adds extra love to your pie. Just ensure it chills properly before baking.Can I bake this pie in advance?
Yes, you can pre-bake it and reheat when ready to serve.Why did my pie turn out soggy?
This can happen if the apples released too much moisture. Make sure to combine the sugar with flour to absorb some of that liquid.How do I know when my pie is done?
The apples should be tender, and the topping should be golden. You can insert a fork to check for tenderness.Can I substitute the rolled oats?
Yes, you can use crushed nuts or skip it entirely if preferred.What’s the best way to slice the pie?
Use a sharp, serrated knife for smooth cuts. Letting it cool slightly will help.Is it normal for some juices to bubble over?
Yes! This happens with fruit pies; just place a baking sheet underneath to catch any drips.How long does the pie keep in the fridge?
Up to 5 days in the fridge, or 3 months if frozen.
Conclusion
Dutch Apple Pie is more than just a dessert; it’s a cherished tradition that brings family and friends together. With this recipe, you’re not only getting a delicious pie but also building connections over shared meals and sweet memories. I challenge you to make this recipe and see how it transforms your gatherings.
Don’t forget to share your thoughts—I’d love to hear how your pie turned out! If you loved this recipe, be sure to check out my other pie recipes for even more deliciousness.
Happy baking! 🍏🥧
PrintDutch Apple Pie

A nostalgic Dutch Apple Pie recipe featuring luscious, spiced apples and a crunchy streusel topping.
- Prep Time: 30 minutes
- Cook Time: 50 minutes
- Total Time: 80 minutes
- Yield: 8 servings 1x
- Category: Dessert
- Method: Baking
- Cuisine: American
- Diet: Vegetarian
Ingredients
- 6 to 8 cups sliced apples (Granny Smith or Honeycrisp)
- 1 cup granulated sugar
- 2 tablespoons lemon juice
- 1 teaspoon ground cinnamon
- 1/4 teaspoon ground nutmeg
- 1 tablespoon all-purpose flour
- 1 tablespoon butter
- 1 package refrigerated pie crusts
- 1/2 cup all-purpose flour (for streusel topping)
- 1/2 cup brown sugar
- 1/2 cup rolled oats
- 1 teaspoon ground cinnamon (for streusel topping)
- 1/4 teaspoon salt
- 1/2 cup cold butter (for streusel topping)
Instructions
- Preheat your oven to 425°F (220°C).
- In a large bowl, toss sliced apples with sugar, lemon juice, cinnamon, nutmeg, and flour. Let sit for 15 minutes.
- Unroll the pie crust and fit into a pie dish, letting excess hang over. Pour apple mixture into the crust and dot with butter.
- Mix flour, brown sugar, rolled oats, cinnamon, and salt in a separate bowl. Cut in cold butter until it resembles coarse crumbs.
- Sprinkle streusel topping over the apple filling.
- Bake for 15 minutes at 425°F, then reduce to 350°F (175°C) and bake for another 30-35 minutes until golden and bubbly.
- Cool slightly before serving.
Notes
Serve warm with vanilla ice cream or whipped cream. Can be stored at room temperature for up to 2 days.
Nutrition
- Serving Size: 1 slice
- Calories: 320
- Sugar: 15g
- Sodium: 150mg
- Fat: 14g
- Saturated Fat: 8g
- Unsaturated Fat: 6g
- Trans Fat: 0g
- Carbohydrates: 45g
- Fiber: 3g
- Protein: 2g
- Cholesterol: 30mg


