
Irresistible Pumpkin Magic Bars Recipe: A Fall Favorite You’ll Adore
Fall has always held a special place in my heart; it’s more than just a season—it’s a warm blanket on chilly nights, pumpkin spice wafting through the air, and cozy gatherings around the kitchen table. One of my all-time favorite treats that embodies this spirit is Pumpkin Magic Bars. As the leaves start to change and the days get shorter, I find myself whipping up these little bites of heaven, transforming my kitchen into a haven of autumn nostalgia.
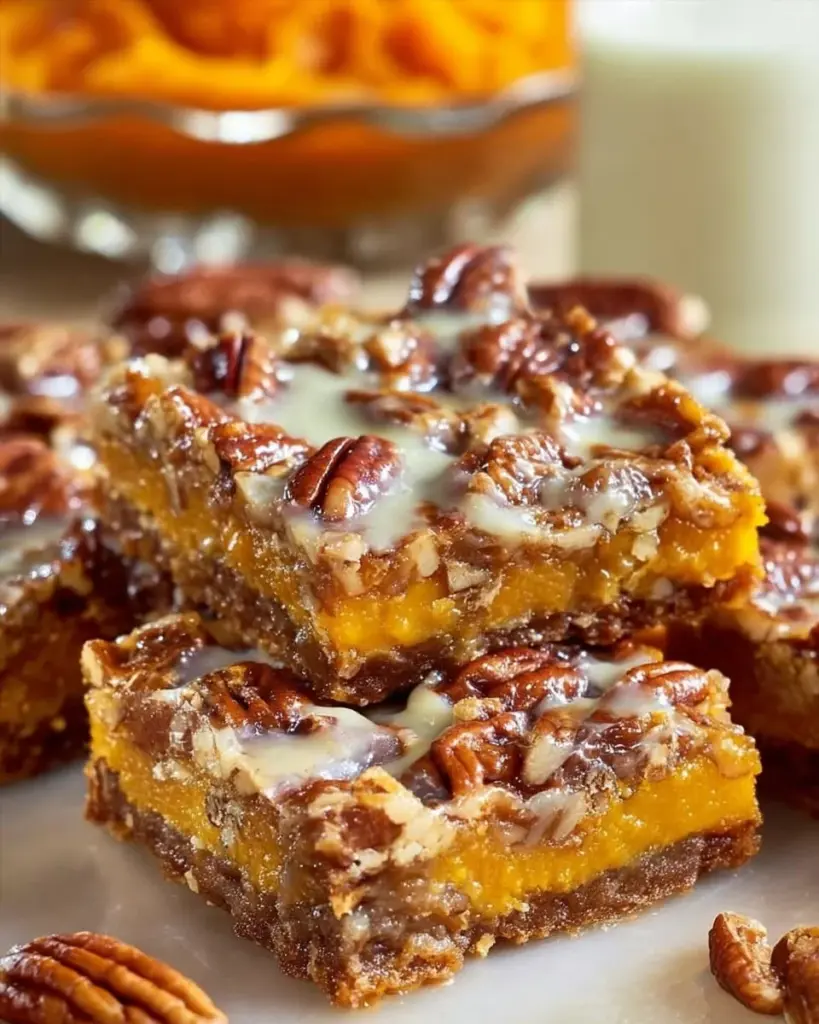
Unlike typical pumpkin bars, these magic bars combine a buttery graham cracker crust with a luscious pumpkin filling and a sprinkle of chocolate chips. The result? A delightful medley of flavors that feels both festive and comforting. What makes this recipe stand out from others is not just the ingredients, but the memories it evokes—sharing them with family after a day of apple picking, or savoring them on a quiet evening with a cup of tea.
Join me, and I’ll guide you through making these Pumpkin Magic Bars that promise to fill your home with holiday spirit and your belly with pure delight. You’ll not only learn how to bake them but also uncover tips for customization and storage to keep your treats fresh and delectable!
What Are Pumpkin Magic Bars?
Pumpkin Magic Bars originated in homes where pumpkin pie reigns supreme but have evolved into a delightful twist—a bar format that offers all the essential fall flavors without the fuss of traditional pies. Imagine taking the classic flavors of pumpkin, spices, and sweetened condensed milk, and blending them into a gooey, layered dessert. They have a buttery, crispy base that provides the perfect contrast to the creamy pumpkin filling, topped off with rich chocolate chips that melt to create a dreamy experience.
The best part? These bars are versatile! They make an excellent addition to your holiday dessert table, are perfect for potlucks, and are a great treat to enjoy while cuddled up on the couch. Whether you’re celebrating Thanksgiving, Halloween, or simply the arrival of fall, Pumpkin Magic Bars are the ideal choice. They promise to be a hit with everyone—young and old alike.
Why You’ll Love This Recipe
You’d be hard-pressed to find a dessert that combines ease, flavor, and nostalgia like these Pumpkin Magic Bars do! Here are a few reasons why this recipe deserves a spot in your kitchen:
Easy to Make: With just a handful of ingredients and minimal prep work, you’ll whip up an incredible dessert that tastes like you spent hours perfecting it. There’s no intricate pie crust to roll out or fancy decorating skills needed!
Affordable Ingredients: Most of the ingredients are kitchen staples or easily found at your local grocery store. You can prepare a delicious dessert without breaking the bank, making these magic bars a cost-effective choice for gatherings.
Customization Options: Love walnuts? Toss in a cup! Prefer a spicy edge? Add a pinch of cayenne for warmth! You can play around with the toppings and make this recipe your own, allowing for endless variations based on your taste preferences.
Family-Sized Portions: This recipe yields about 16 generous bars, making it perfect for sharing. When I bake these for family gatherings, they disappear faster than I can cut them into squares.
Quick Assembly: The overall time investment is about an hour, and you’ll have a dessert that can be enjoyed warm or chilled. Plus, they are easy to transport if you want to share with friends or loved ones.
If you’ve ever eyed those expensive premade bars at the store, you’ll appreciate knowing you can create something even better (and fresher!) at home for a fraction of the price.
Ingredients
To make these scrumptiously sweet Pumpkin Magic Bars, here’s what you’ll need:
Ingredients List
- 1 cup graham cracker crumbs: For a crunchy base, feel free to use store-bought or crush your own!
- 1/2 cup melted butter: If you can, use unsalted butter for balanced sweetness. Bring to room temperature to ensure an even blend.
- 1 can (15 oz) pumpkin puree: Not to be confused with pumpkin pie filling—check labels to ensure you’re using pure pumpkin.
- 1 cup sweetened condensed milk: This adds creaminess and sweetness, making your bars rich and indulgent.
- 3 large eggs: These should be at room temperature for easy incorporation.
- 1 teaspoon vanilla extract: Opt for pure vanilla for a deeper flavor.
- 1 teaspoon cinnamon: A warm spice that evokes feelings of fall.
- 1/2 teaspoon nutmeg: Adds a cozy depth to each bite.
- 1/2 teaspoon salt: Enhances all the flavors and balances sweetness.
- 1 cup chocolate chips: Semi-sweet or dark chocolate works beautifully here—don’t skimp, as they add that delightful melty factor.
- 1 cup chopped nuts (optional): Pecans or walnuts can add a lovely crunch; however, feel free to leave them out for a nut-free treat.
Prep Notes
- Make sure your butter is melted and slightly cooled before mixing.
- If you’re super organized, prep your ingredients ahead of time to streamline the process.
Brand Recommendations
- I personally love using Nabisco graham crackers for that classic flavor.
- For chocolate chips, Ghirardelli makes a rich choice that brings an excellent taste to the bars.
Step-by-Step Instructions
Prep Your Oven and Dish
- Preheat the oven to 350°F (175°C): Allow your oven to preheat fully—this is crucial for even baking.
- Grease a 9×13 inch baking dish: Use non-stick spray or a light coat of butter, ensuring easy removal post-baking.
Make the Crust
- Prepare the Crust: In a medium bowl, combine 1 cup graham cracker crumbs and 1/2 cup melted butter. Mix until all crumbs are moistened, then press the mixture firmly into the bottom of the prepared baking dish. Use the back of a measuring cup to flatten it out evenly.
Craft the Filling
- Prepare the Pumpkin Mixture: In a large bowl, whisk together 1 can of pumpkin puree, 1 cup sweetened condensed milk, 3 large eggs, 1 teaspoon vanilla extract, 1 teaspoon cinnamon, 1/2 teaspoon nutmeg, and 1/2 teaspoon salt until smooth and creamy.
Assemble
- Pour Filling Over Crust: Carefully pour the pumpkin mixture over the graham cracker crust and spread it evenly using a spatula.
Add Toppings
- Sprinkle It Up: Generously sprinkle 1 cup chocolate chips and 1 cup chopped nuts (if using) on top of the pumpkin filling, pressing them gently into the mix.
Bake!
- Bake: Pop your baking dish into the oven and let it bake for 30-35 minutes or until the center is set and slightly puffed. Check doneness by gently shaking—if it jiggles like gelatin, give it a few extra minutes.
Cool and Serve
- Cool Completely: Remove your delicious creation from the oven and let it cool for at least 15 minutes before cutting into bars.
Chef’s Tips!
- Keep a close eye during the last few minutes to avoid overbaking. You want the center just set!
- Allowing it to cool completely before cutting helps maintain clean edges.
Expert Tips & Tricks
Storage: Store your Pumpkin Magic Bars in an airtight container at room temperature for up to 3 days, or in the fridge for up to a week. They can also be frozen (just make sure to wrap them tightly) for up to 3 months!
Make-Ahead: These bars are fabulous for prep ahead of time! Bake them a day or two in advance, allowing flavors to meld—trust me, they taste even better the next day.
Troubleshooting: If your bars are too crumbly, try using a bit more melted butter next time; if they’re too mushy, ensure your oven temperature is accurate and you’ve given them enough time to set.
Don’t Skip the Salt: The salt brings out the sweetness and balances the flavors. Just a pinch can make a huge difference!
Cutting Tips: Use a sharp knife dipped in hot water for clean slices—this ensures nice edges for presentation!
Serving Suggestions
These Pumpkin Magic Bars shine on their own, but if you want to elevate your serving, consider pairing them with:
- Whipped Cream: A dollop of sweetened or spiced whipped cream adds a lovely touch.
- Coffee or Tea: Enjoying these bars with a warm beverage creates a cozy afternoon snack.
- Fall Fruits: Sliced apples or pears sprinkled with cinnamon or a scoop of vanilla ice cream provide a delightful contrast.
Variations & Substitutions
- Flavor Combinations: Feel free to experiment! Try adding shredded coconut for a tropical twist, or a swirl of peanut butter for a nutty contrast.
- Dietary Adjustments: For a gluten-free option, use gluten-free graham crackers or almond flour in place of the crust. You can also swap sweetened condensed milk for coconut milk for a dairy-free alternative.
- Be Seasonal: Introduce caramel bits for a caramel-cream combo, or try switching out the pumpkin for sweet potato or butternut squash during those seasonal transitions.
Nutrition & Storage Info
- Prep Time: 20 minutes
- Cook Time: 35 minutes
- Total Time: 1 hour
- Yield: About 16 bars
- Calories: Approximately 150-200 calories per bar (depends on exact ingredients used).
Storage
- Store at room temperature for up to 3 days, in the fridge for up to a week, or freeze for 3 months.
FAQ Section
Can I make these bars in advance?
Yes! These bars are perfect for making a day or two ahead of time.What’s the best way to store leftovers?
Store them in an airtight container at room temperature or in the fridge.Can I use fresh pumpkin instead of canned?
Absolutely! Just make sure to cook and puree your pumpkin thoroughly.Do these bars freeze well?
Yes! Wrap them tightly and freeze for up to three months.Can I use a different nut instead of walnuts?
Of course! Pecans or almonds would be delicious alternatives.What if I don’t like chocolate in my bars?
You can omit the chocolate chips and replace them with more nuts or leave them plain!Can I add other spices?
Yes! Feel free to add a pinch of ginger, allspice, or cloves for more warmth.What if my bars are too soft?
They may need a bit more time in the oven. Check them at 35 minutes and bake until set.What’s the best way to cut the bars?
Use a sharp knife, dipped in hot water for clean cuts.What occasions are these bars perfect for?
They’re great for Halloween, Thanksgiving, or any fall gathering!
Conclusion
In a world filled with desserts, these Pumpkin Magic Bars truly capture the essence of fall. Rich, decadent, and oh-so-easy to whip up, they will quickly become a staple in your baking repertoire. I encourage you to try this recipe, gather your loved ones, and savor the deliciousness together!
I’d love to hear your feedback or see your creations, so please drop me a comment below. And if you’re looking for other festive treats, don’t miss my blog posts about Apple Crisp and Caramel Pecan Brownies. Happy baking, friends! 🍂✨
PrintIrresistible Pumpkin Magic Bars
Delicious Pumpkin Magic Bars with a buttery graham cracker crust, creamy pumpkin filling, and topped with chocolate chips, perfect for fall gatherings.
- Prep Time: 20 minutes
- Cook Time: 35 minutes
- Total Time: 55 minutes
- Yield: 16 bars 1x
- Category: Dessert
- Method: Baking
- Cuisine: American
- Diet: Vegetarian
Ingredients
- 1 cup graham cracker crumbs
- 1/2 cup melted unsalted butter
- 1 can (15 oz) pumpkin puree
- 1 cup sweetened condensed milk
- 3 large eggs
- 1 teaspoon vanilla extract
- 1 teaspoon cinnamon
- 1/2 teaspoon nutmeg
- 1/2 teaspoon salt
- 1 cup chocolate chips
- 1 cup chopped nuts (optional)
Instructions
- Preheat the oven to 350°F (175°C) and grease a 9×13 inch baking dish.
- In a medium bowl, combine graham cracker crumbs and melted butter, then press firmly into the baking dish.
- In a large bowl, whisk together pumpkin puree, sweetened condensed milk, eggs, vanilla extract, cinnamon, nutmeg, and salt until smooth.
- Pour the pumpkin mixture over the crust and spread evenly.
- Sprinkle chocolate chips and nuts on top, pressing them gently into the mixture.
- Bake for 30-35 minutes until the center is set, then let cool for at least 15 minutes before cutting into bars.
Notes
Store in an airtight container for up to 3 days at room temperature or in the fridge for up to a week. They can be frozen for up to 3 months.
Nutrition
- Serving Size: 1 bar
- Calories: 175
- Sugar: 15g
- Sodium: 150mg
- Fat: 8g
- Saturated Fat: 4g
- Unsaturated Fat: 3g
- Trans Fat: 0g
- Carbohydrates: 25g
- Fiber: 2g
- Protein: 3g
- Cholesterol: 50mg


