
Rustic Honeycrisp Apple Galette: The Ultimate Fall Dessert You’ll Fall for!
There’s something undeniably magical about the aroma of a freshly baked pie wafting through my kitchen, especially when it involves the crisp, juicy delight of a Rustic Honeycrisp Apple Galette. Growing up, my grandmother would whip up her famous apple galette every autumn, using the tastiest Honeycrisp apples she could find. Those memories of gathering around her wooden kitchen table, our faces smeared with bits of apple and gooey caramel sauce, are cherished treasures in my heart.
What sets my Rustic Honeycrisp Apple Galette apart from others is not just the balance of tartness and sweetness from the Honeycrisp apples, but the soul-warming simplicity of how everything comes together. Unlike traditional pies, this galette embraces its rustic charm with an imperfect, freeform crust, making each one unique—just like each family gathering. You’ll learn how, with just a handful of everyday ingredients, you can recreate this comforting dessert that feels like a warm hug on a chilly day.
Get ready to unlock the secrets of crafting the perfect galette that your loved ones will request year after year!
What Are Rustic Honeycrisp Apple Galettes?
Originating from the French countryside, a galette is a free-form pastry that celebrates simplicity and the beauty of seasonal ingredients. Traditionally, these rustic treats could be filled with various fruits, but there’s something decidedly special about the Honeycrisp apple. Known for their crisp texture and balanced sweetness, Honeycrisp apples elevate this dessert to new heights.
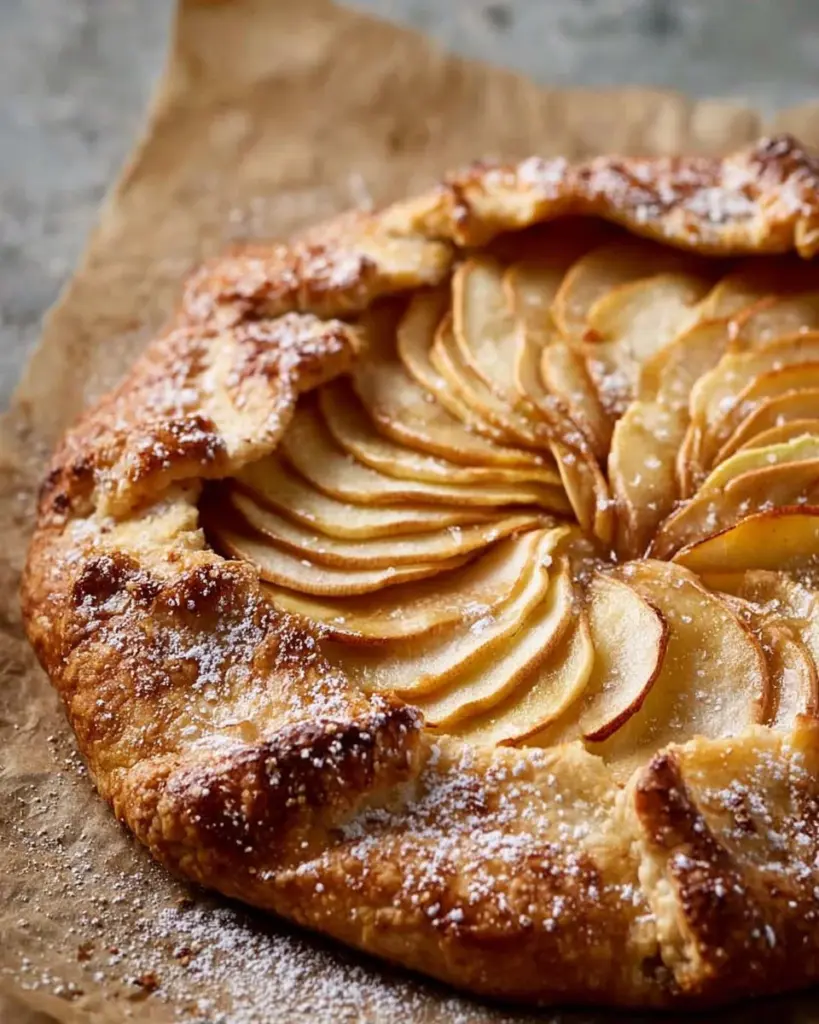
When baked, the galette’s buttery crust turns golden and flaky, cradling tender apple slices that caramelize beautifully, creating a delightful contrast of textures. It’s a dessert that’s not just easy to make, but also allows for creativity and personality in the way it’s presented.
Whether you find yourself celebrating a cozy family dinner or wanting to impress guests at a gathering, this Rustic Honeycrisp Apple Galette is perfect for any occasion, making it a go-to recipe for both novice and seasoned bakers alike.
Why You’ll Love This Recipe
Homemade vs. Store-Bought: Let’s be real—while grabbing a store-bought pie might be convenient, nothing beats the warm, homemade vibe of this Rustic Honeycrisp Apple Galette. Store-bought versions often lack that fresh-out-of-the-oven charm, and you’ll savor the flavors knowing you crafted it with love.
Cost-Effective: With just a handful of ingredients, you’ll spend far less than you would on a fancy dessert from a café. You’ll be amazed at how a simple galette, using
1.25 cups all-purpose flour, 3 Honeycrisp apples, and some butter, provides a delicious return on your investment!
Customization Galore: Want to blend in some caramel, or perhaps swap the Honeycrisp for Granny Smith or pears? The beauty of this galette is that it plays well with various fruits and spices, allowing you to express your baking style.
Easy and Quick: No complex lattice or intricate designs here! This Rustic Honeycrisp Apple Galette embodies ‘easy’ without sacrificing taste. It’s beginner-friendly and can be turned out in about 90 minutes, which includes chilling time for the crust.
A Recipe to Cherish: This is a recipe that invites nostalgia and comfort. You’ll channel memories of warm family gatherings each time you prepare it, making it a delightful tradition that you can pass on to loved ones—just as my grandmother did for me.
Ingredients
For the Crust
- 1 1/4 cups all-purpose flour (Use King Arthur Flour for consistent results)
- 1 tablespoon granulated sugar
- 1/2 teaspoon salt
- 1/2 cup unsalted butter, cold and cubed (I love using Plugra for its high butterfat content)
- 3-4 tablespoons ice water (Make sure it’s super cold!)
For the Filling
- 3 Honeycrisp apples, peeled and thinly sliced
- 2 tablespoons granulated sugar (adjust based on apple sweetness)
- 1 tablespoon brown sugar (optional)
- 1 teaspoon ground cinnamon (Ceylon cinnamon for a touch of luxury)
- 1/4 teaspoon ground nutmeg
- 1 tablespoon lemon juice (freshly squeezed for best flavor)
- 1 teaspoon vanilla extract
For Assembly
- 1 egg (for egg wash)
- Coarse sugar (for sprinkling)
- Caramel sauce or powdered sugar (for garnish) (You could even try homemade caramel!)
Prep Notes: Remember to keep your butter cold for a flaky crust! Cut it into small cubes and return it to the fridge while you prep your other ingredients.
Step-by-Step Instructions
Making the Dough: In a mixing bowl, combine the flour, granulated sugar, and salt. Cut in the cold, cubed butter until the mixture resembles sandy crumbs with pea-sized chunks, almost like breadcrumbs—this takes about 5-7 minutes. Gradually add the ice water, one tablespoon at a time, until a dough forms (this should take about 3-5 minutes). Cover with plastic wrap and chill in the refrigerator for at least 30 minutes.
Chef’s Tip: Make sure not to overmix the dough; you want those little bits of butter to remain intact for flakiness.
Prepare the Filling: Peel and thinly slice the Honeycrisp apples, then toss them in a bowl with granulated sugar, brown sugar (if using), cinnamon, nutmeg, lemon juice, and vanilla extract. Let this sit for about 10-15 minutes to develop those delicious juices. You might even sneak a taste—this filling is divine!
Preheat & Roll: Preheat your oven to 400°F (200°C). On a floured surface, roll the chilled dough into a 12-inch circle, about 1/8-inch thick. Transfer to a parchment-lined baking sheet, making sure it doesn’t tear—it adds to the rustic charm!
Assemble the Galette: Layer the apple mixture in the center of the dough, leaving a 2-inch border around the edges. Gently fold and pleat the crust over the filling; don’t worry about it being perfect—the beauty is in its imperfection.
Chef’s Tip: If the crust tears a bit, just patch it up with extra dough—no one will notice once it’s baked!
Brush & Bake: Whisk the egg and brush it over the crust, then sprinkle with coarse sugar. Bake for 35-40 minutes until the crust is golden brown and the apples are tender (they should feel soft to the touch). You’ll know it’s ready when your kitchen starts to smell like fall!
Cool & Serve: Allow the galette to cool slightly before slicing. Serve it warm, either plain, or drizzled with caramel sauce or a dusting of powdered sugar. Trust me—you’ll hear “mmm” from every corner of the table!
Expert Tips & Tricks
Best Apple Choices: Using Honeycrisp is my top recommendation, but pairing them with some tart Granny Smith adds a delightful flavor contrast.
Storage Recommendations: Store leftovers in an airtight container at room temperature for up to 2 days or in the fridge for up to 4 days. The crust may lose some crispiness, but it will still taste delicious.
Make-Ahead Options: You can prepare the dough a day ahead and keep it in the fridge. The apple filling can also be prepped a few hours in advance; just toss the apples in a bit of lemon juice to prevent browning.
Common Problems: If your crust is too crumbly, it may need more water; add one tablespoon at a time until it holds together. Conversely, if it’s too wet, sprinkle in a bit more flour during the mixing process.
Reheating: To reheat, pop slices back in the oven at 350°F (175°C) for about 10-15 minutes to regain that fresh-baked texture.
Serving Suggestions
This Rustic Honeycrisp Apple Galette pairs wonderfully with a scoop of vanilla bean ice cream or a dollop of freshly whipped cream. To elevate the presentation, you could serve it on a rustic wooden board, garnished with a sprinkle of cinnamon and maybe even some fresh mint leaves for color.
It’s an ideal dish for cozy family gatherings, Thanksgiving get-togethers, or even casual Friday night dinners. Feel free to cut it into smaller pieces for brunch celebrations or to impress guests at a potluck!
Variations & Substitutions
- Spice it Up: Consider adding a pinch of ground ginger or allspice for extra warmth.
- Nutty Additions: Toss in some chopped walnuts, pecans, or even hazelnuts for a delightful crunch!
- Dietary Adaptations: For a gluten-free version, simply swap the all-purpose flour for a gluten-free flour blend.
- Seasonal Variations: Experiment with seasonal fruits such as pears, peaches, or even berries for a summer galette.
Nutrition & Storage Info
- Prep Time: 30 minutes (plus chilling)
- Cook Time: 35-40 minutes
- Total Time: 1 hour 10 minutes
- Yield: About 8 slices
- Estimated Calories: 220 per slice (calories may vary based on specific ingredients used)
Storage Info:
- Room Temperature: 1-2 days
- Refrigerator: 3-4 days
- Freezer: Wrap it well in plastic wrap and foil for up to 2 months. Reheat in the oven for best results.
FAQ Section
Can I use other apple varieties?
Yes, while Honeycrisp is my favorite, feel free to mix in Granny Smith for tartness or Fuji for extra sweetness!Is it necessary to peel the apples?
While you can leave the skin on for a rustic feel, peeling them gives a smoother texture.What can I serve with my galette?
Complement it with vanilla ice cream, whipped cream, or a drizzle of caramel sauce for that extra indulgence!Can I make the dough ahead of time?
Absolutely! You can prepare the dough up to 24 hours in advance. Keep it wrapped tightly in the fridge.How do I prevent a soggy bottom crust?
Make sure to blind-bake the crust for 10-15 minutes before adding the filling for a perfectly crisp bottom.Can I freeze leftover galette?
Yes! Wrap individual slices in plastic and aluminum foil, then freeze. Reheat in the oven before serving.Is it necessary to use an egg wash?
The egg wash promotes a beautiful golden crust, but you can omit it for a vegan recipe; simply brush with non-dairy milk instead.How do I store leftovers?
Store in an airtight container. It’s best enjoyed at room temperature but can be refrigerated as well.What if my crust is too crumbly?
If the dough feels dry and crumbly, gradually add ice water until it holds together better.Can I use a different sweetener?
Absolutely! Feel free to swap in maple syrup or honey, but note that it may alter the overall texture a bit.
Conclusion
Creating this Rustic Honeycrisp Apple Galette is not just about the delectable flavors; it’s about weaving together memories, love, and joy in the kitchen. This recipe has the power to bring people together, making it a cherished family tradition. If you’re looking for an easy yet satisfying dessert that encapsulates the essence of comfort food, look no further!
I’d love to hear how your galette turns out! Share your experiences in the comments, and don’t forget to check out other fall-inspired recipes on my blog that will warm your heart and home. Happy baking!
PrintRustic Honeycrisp Apple Galette

A simple, free-form pastry filled with Honeycrisp apples, caramelized to perfection, creating a balance of sweetness and tartness.
- Prep Time: 30 minutes
- Cook Time: 40 minutes
- Total Time: 70 minutes
- Yield: 8 slices 1x
- Category: Dessert
- Method: Baking
- Cuisine: French
- Diet: Vegetarian
Ingredients
- 1 1/4 cups all-purpose flour
- 1 tablespoon granulated sugar
- 1/2 teaspoon salt
- 1/2 cup unsalted butter, cold and cubed
- 3–4 tablespoons ice water
- 3 Honeycrisp apples, peeled and thinly sliced
- 2 tablespoons granulated sugar
- 1 tablespoon brown sugar (optional)
- 1 teaspoon ground cinnamon
- 1/4 teaspoon ground nutmeg
- 1 tablespoon lemon juice
- 1 teaspoon vanilla extract
- 1 egg (for egg wash)
- Coarse sugar (for sprinkling)
- Caramel sauce or powdered sugar (for garnish)
Instructions
- In a bowl, combine flour, granulated sugar, and salt. Cut in butter until sandy crumbs form. Gradually add ice water until dough forms. Chill for 30 minutes.
- Peel and slice apples, tossing with granulated sugar, brown sugar, cinnamon, nutmeg, lemon juice, and vanilla. Let sit for 10-15 minutes.
- Preheat oven to 400°F (200°C). Roll out chilled dough into a 12-inch circle and place on a baking sheet.
- Layer apple mixture in the center of the dough, folding edges over the filling, leaving a 2-inch border.
- Brush with egg wash and sprinkle with coarse sugar. Bake for 35-40 minutes until crust is golden brown.
- Let cool slightly, then serve warm with caramel sauce or powdered sugar.
Notes
Best served warm with ice cream or whipped cream. Can be made ahead and stored for up to 4 days.
Nutrition
- Serving Size: 1 slice
- Calories: 220
- Sugar: 14g
- Sodium: 200mg
- Fat: 12g
- Saturated Fat: 7g
- Unsaturated Fat: 4g
- Trans Fat: 0g
- Carbohydrates: 29g
- Fiber: 2g
- Protein: 2g
- Cholesterol: 37mg


